|
01 December, 2021 Trevor and Kristen's second son, Tanner Mathew, was born this afternoon just before 6pm. Welcome to the world! As soon as Tanner can hold tools, we'll get him working on the pre-runner alongside his older brother, Henry... I'm thinking that Tanner's arrival will make finding time to work on the pre-runner a little more challenging for Trevor over the next several months though. I have no doubt that we'll find opportunities but it may be a while before we can post any progress photos. Congratulations Trevor and Kristen!
23 November, 2021 We're happy to report that our buddies at "Basecamp Off-Road" (Race #585) made it to the finish line in their 5/1600 car at the Baja 1000 race last weekend! This was their third race ever - the previous two were also Baja 1000 attempts. To say that they've had a steep learning curve is a large understatement; racing Baja is not for the faint of heart... We were not able to attend the race due to the impending arrival of Trevor's second baby (it'd be bad form to be away racing in Baja when his baby decided it was time to meet the world - even if it was the Baja 1000!) . We were able to be involved in the pre-race planning and some problem solving by telephone during the race. Congratulations guys; you "adapted, improvised and overcame" to get to the finish line in a peninsula run Baja 1000! That's a truly remarkable achievement that very few can claim. Everything is revolving around the new baby's arrival for us at the moment; it may be a while before things settle enough to make progress on the pre-runner.
17 November, 2021 No pre-runner progress to report; work and family matters have been keeping us busy for the last month (Trevor and his wife have a baby due before Thanksgiving). Our next project will be the mounting and plumbing of the engine radiator. We have the radiator on hand - we'll be engineering a mounting solution and begin fabrication when we have some free time...
16 October, 2021 Not much in the way of pre-runner work getting done right now - We've been helping plan for a 5/1600 car entry in the Baja 1000 this year. We can't participate directly due to the impending arrival of a new family member expected to arrive during the race but we can help plan the race and the attendant logistics. That's an amazingly time consuming thing but we have some experience we're happy to share with "Basecamp Off Road" once again. They'll be car #585; a great bunch of guys from "Upstate New York" with a bucket list that includes finishing the Baja 1000.
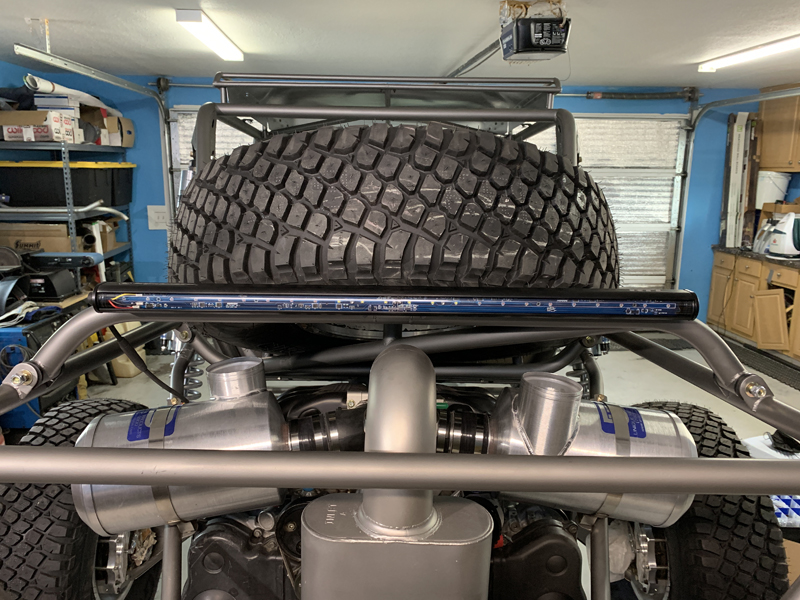
25 September, 2021 Trevor and I finished the air filter and Tail light installations today.
You can also see the rear light bar mounted just below the spare tire; it's mounted to the rear spare tire support tube for good visibility to any vehicles behind us. We'll need to fashion a heat shield to protect it from the exhaust heat...
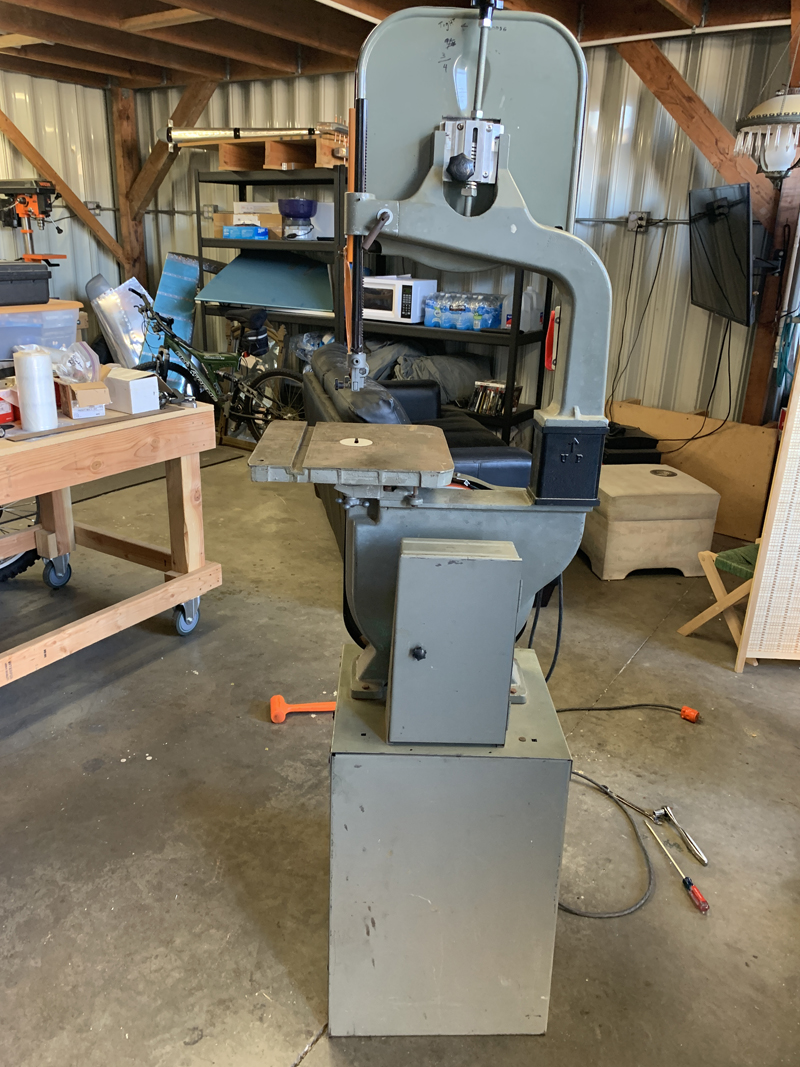
23 September, 2021 Our fabrication tools have evolved over the years to include welders, plasma cutter, lathe and mill but we never had a band saw until now. We had hack saws, cut-off wheels and a plasma cutter but no band saw... That caused us to spend much more time cutting parts to shape than it would have taken with a band saw; I finally had enough of doing it the "hard way" and purchased a used, medium duty band saw.
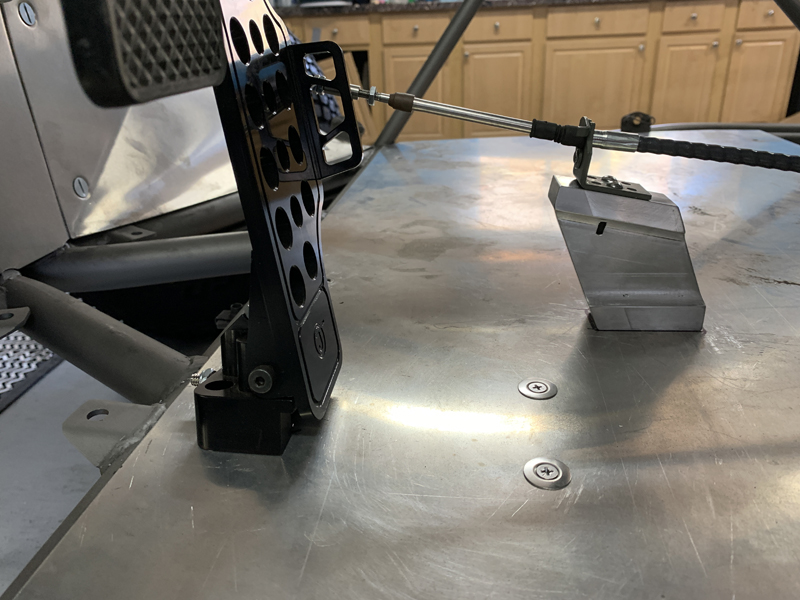
18 September, 2021 Another productive day working on the pre-runner; we finished the spare tire support structure and the throttle cable mounts.
I had spent some time earlier in the week making the gas pedal end throttle cable mount so it was ready to install - we now have a complete linkage from the gas pedal to the throttle body. I still need to fine tune the return spring setup; it returns to idle a little less "crisply" than we want. That should just be a simple matter of winding the return spring another turn or so...
11 September, 2021 Trevor and I spent all day working on the the pre-runner today; we have the basic spare tire support structure installed now. Next will be some additional structure to locate the tire hold-down receptacle. While Trevor was fitting the tubes and welding, I was working on the throttle cable installation. That requires the fabrication of brackets for holding the ends of the cable in addition to intermediate supports to keep the cable from flexing under load. The engine end cable support is complete and I've made a template for the "gas pedal" end; hopefully I can fabricate that bracket this week and install it next weekend. For the last few minutes of the day, we looked at options for locating the air filters, the dry sump reservoir and the power steering reservoir. It gets a little cramped back there...
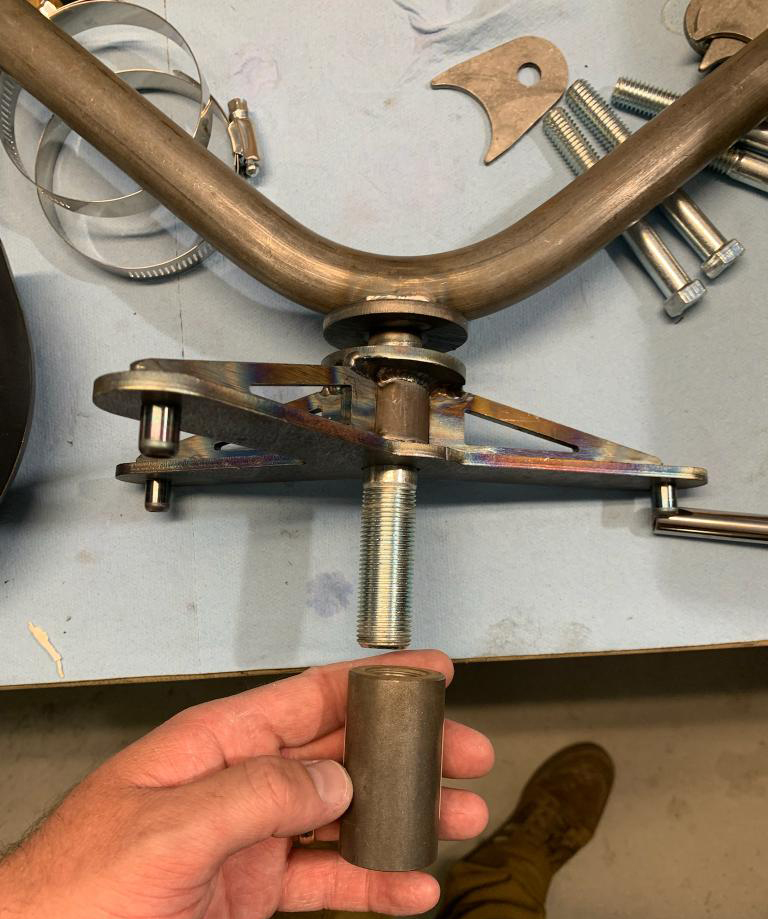
02 September, 2021 I spent a little time on the computer designing our pre-runner spare tire support structure Monday night and couple of hours at the shop on Tuesday bending up the main tubes. I made the bends exactly as designed but left the "straight" section between the bends a little long - we'll need to cut them to fit then weld them back together. That way, we can get an exact fit more easily than trying to bend the parts perfectly. We'll internally sleeve the welded joints so they'll be stronger than prior to cutting. We converted our JD2 model 3 bender to "air over hydraulic" some time ago; that makes bending the 1.5" 4130 tubing easy. I now have a "kit" of parts for the spare tire support ready for the next time we work on the pre-runner. I also ordered and received the throttle cable parts we need to complete that installation - we'll have plenty to do next time.
28 August, 2021 Easy day on the pre-runner today - all engineering. We needed to design a spare tire support structure that will be mounted above the engine. That structure needs to support the tire securely with adequate clearance from the engine, exhaust, fuel cell and radiator - and be removable. We've decided on a tubular support that "tilts" the tire downward at the front and upward at the rear to clear the exhaust. Our tube stock and JD Squared bender are at the other shop location so next time we're free, we'll make the parts then fit them to the pre-runner. After designing the spare support, we measured for a throttle cable and began planning the support structure for it - need to get parts ordered next. Finally, we spent a little time talking about radiator support structure options. Since the radiator will sit above the fuel cell and the the fuel cell is removable "upward", we need the radiator support structure to also be removable or completely out of the way... We don't want to have to order a custom made radiator so we're trying to work with what's available off the shelf. We think we have a general idea of how to do it but it'll be easier to envision with an actual radiator on hand... More parts to order...
24 August, 2021 Nothing much to report for last weekend. We flew Southwest Airlines to Spokane, WA on Thursday to pick up a car Trevor bought; a really pristine, low mileage Audi S4. Teryl and I spent the next couple of days driving it home for him, doing our best to avoid the smoke from all the wild fires in the WA, OR and CA. We didn't get home until Saturday afternoon after the 1200+ mile drive so no pre-runner work that day. Trevor and Kristen came over on Sunday to get the car so no pre-runner work that day either. Hopefully back on the pre-runner soon (but not next weekend - other commitments).
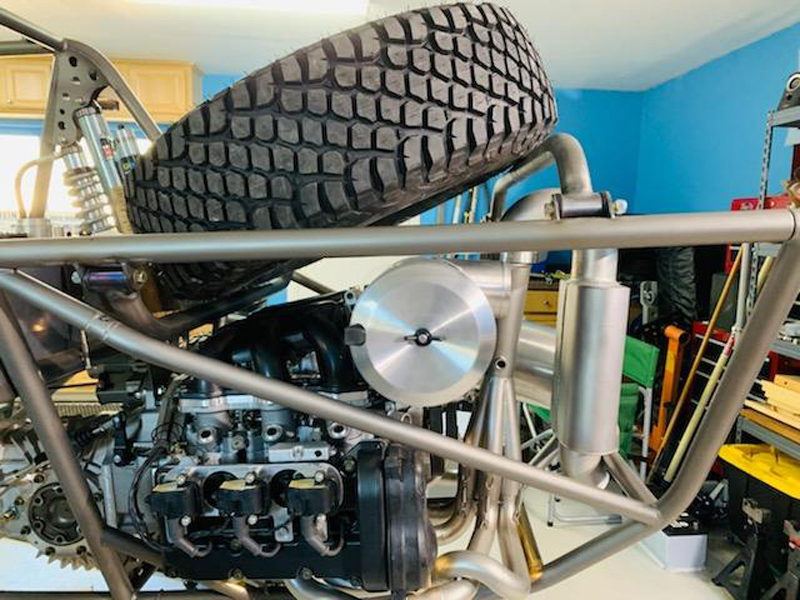
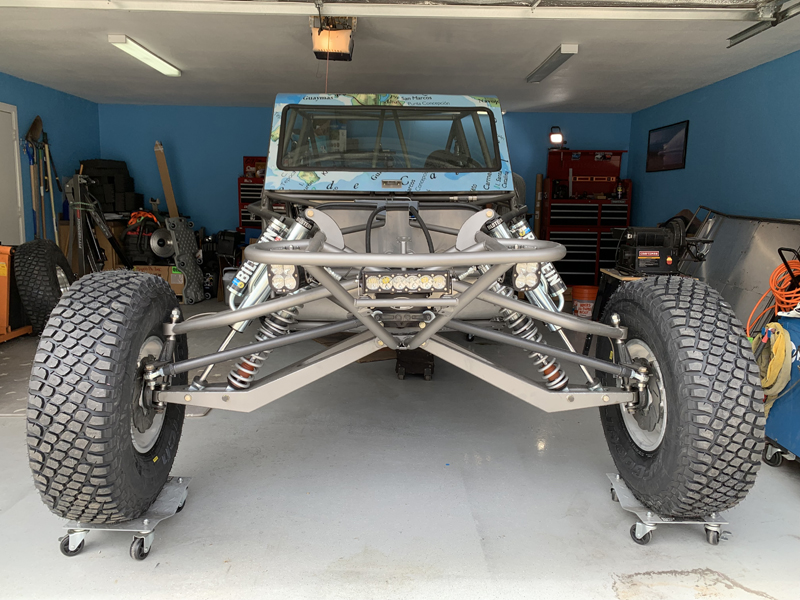
14 August, 2021 Today was a "half-day" working on the pre-runner and trailer. We finally got the race car spares off the pre-runner in favor of the tires and wheels that were intended to be on it from the beginning - it looks correct now.
The actual tire swap only took a few minutes but then we had to admire the new look and take photos.... We also spent a little time planning for the mounting of our spare tire and radiator. Afterwards, we spent most of the rest of our time on "sanitizing" the trailer wiring. The wiring was all there but we wanted to route and secure it all neatly - we're happy with the result.
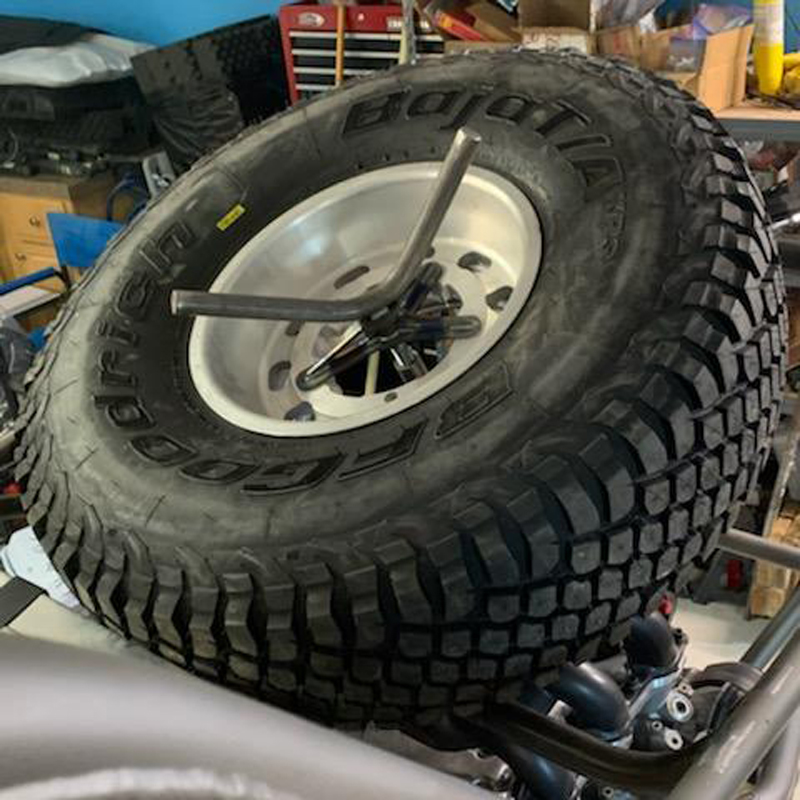
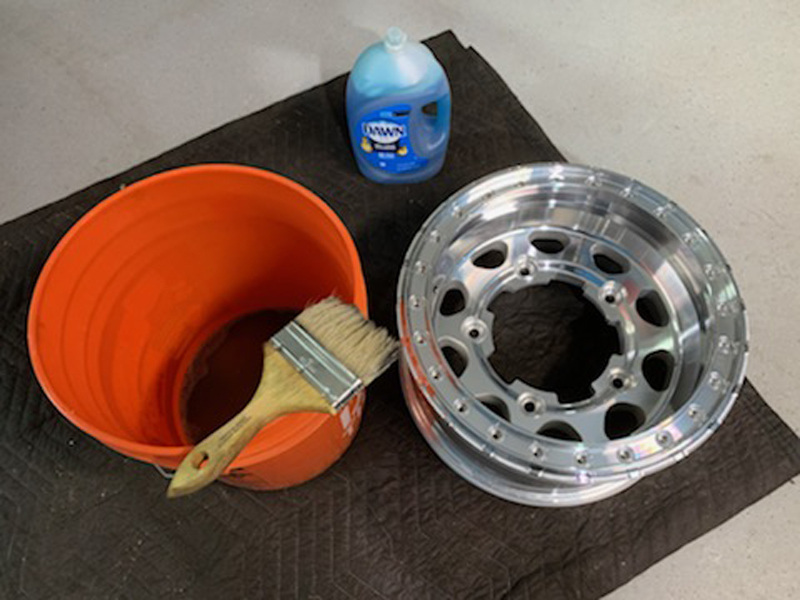
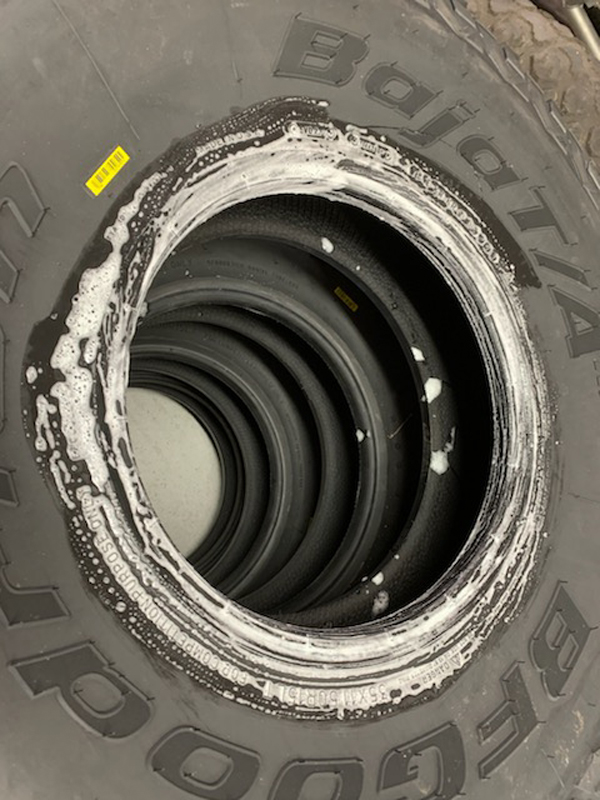
10 August, 2021 Our BFG tires arrived yesterday and Trevor couldn't wait for me to get them mounted. As soon as he was done with work today, he headed to the garage to start the work; these are heavy tires with thick sidewalls so it's bit of a wrestling match...
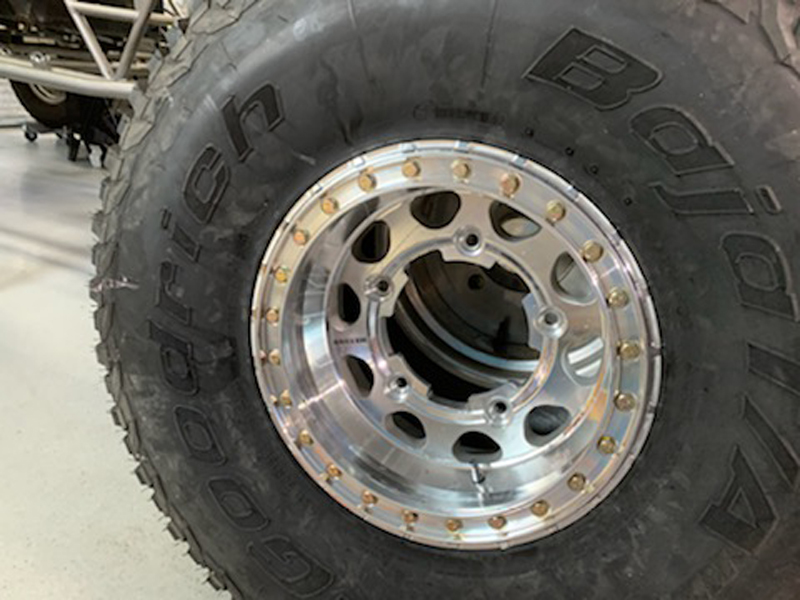
Our wheels are a "bead-lock" style so once lubricated, the tire will slip over the bead-lock side (with the actual lock ring removed) with little effort. Once the tire is on the wheel, the lock ring is installed, capturing the tire and holding it so that there is no slippage at low tire pressures. That's a real advantage in soft terrain - we can "air - down" for better "flotation" and not worry as much about rolling a tire off the bead.
The bead lock ring is secured to the wheel with 24 bolts - that's a lot of bolts to tighten evenly! Finally, we'll be able to get the race car tires off the pre-runner!
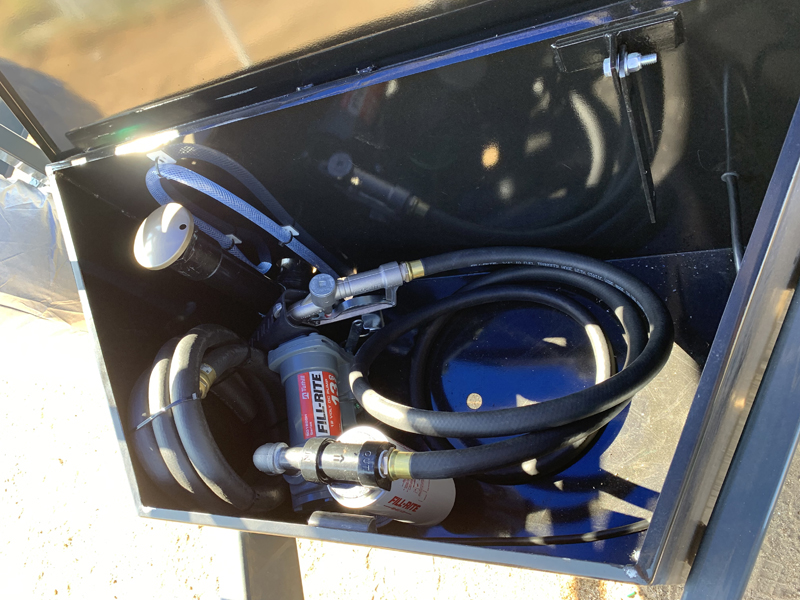
07 August, 2021 This was another "trailer work" day for Trevor and I; we fabricated, installed and tested the auxiliary fuel tank pumping system. That involved the mechanical mounting of the pump itself, fabrication of the fuel feed system between the tank and pump, installation of a fuel filter and fabricating/installing the wiring to power the pump. It was all very straight forward; we had collected the necessary components for the mounting, plumbing and electrical systems over the past couple of weeks so we had everything we needed to complete the job. We're happy to say that it works perfectly and we can get back to working on the pre-runner again!
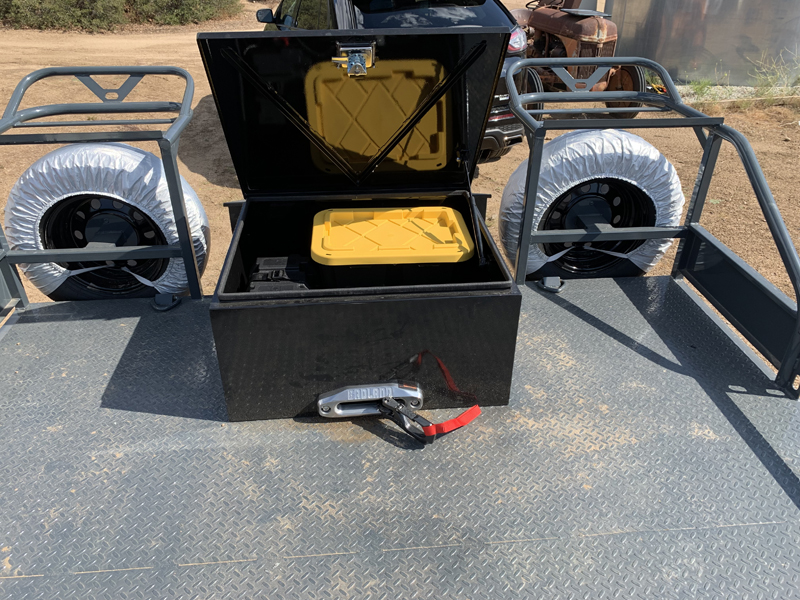
The fuel pump/filter unit is mounted in the "tongue" storage box, away from "bed box" mounted winch and battery in order to keep the fuel and possible ignition sources separate... The fuel tank fill tube and vent are visible adjacent to the fuel pump. We have some spare hose coiled up and stored between the pump and the wall of the storage box.
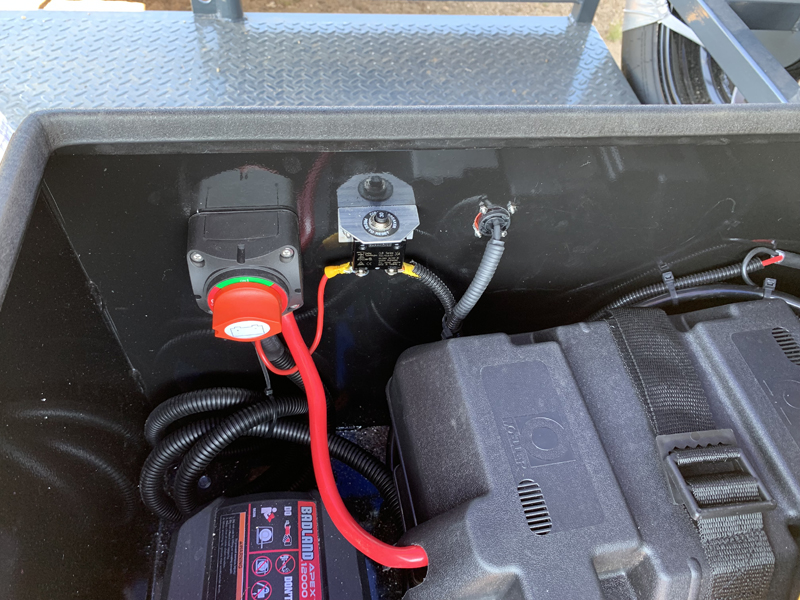
The fuel pump receives electrical power through a circuit breaker that connects to the "battery disconnect" switch in the winch/battery storage box on the deck of the trailer - I have a little more work to do here. Also visible to the right of the circuit breaker is a waterproof battery charging connector that allows us to plug in a battery "maintainer" without opening the storage box lid - if we need to fast charge the battery though, we'll want the lid open for good ventilation.
This waterproof connector allows us to keep the winch/fuel pump battery charged when not in use. For now, we have a solar panel "battery maintainer" connected - it's a smart charger that automatically keeps the battery fully charged as long as the sun shines... We're also thinking about wiring the winch battery into the trailer "emergency brake" battery charging circuit; it'll charge along with the brake system battery when the trailer electrics are connected to a tow vehicle. Pre-runner - It's been a few weeks since we last worked on the pre-runner; the trailer and family matters have kept us busy... We're getting back to it now though; we have the "BFG" tires we want coming (hopefully this week). We'll mount them on our new "Method" wheels and finally get the 5-1600 car spares off and the correct tires/wheels on! We didn't want to buy tires too soon but it seems like the time is right. Hopefully the next update will show the pre-runner on correct tires and wheels! 2021 Baja 1000 - Trevor had been planning to run "Basecamp Off-Road's" 5-1600 car for a portion of this years' Baja 1000 but with another baby due to arrive that same week, there'll be no B1K for Trevor this year! We'll be helping Matt and "Basecamp Off-road" as much as we can from home but we can't support them in Baja this time. Sorry guys!
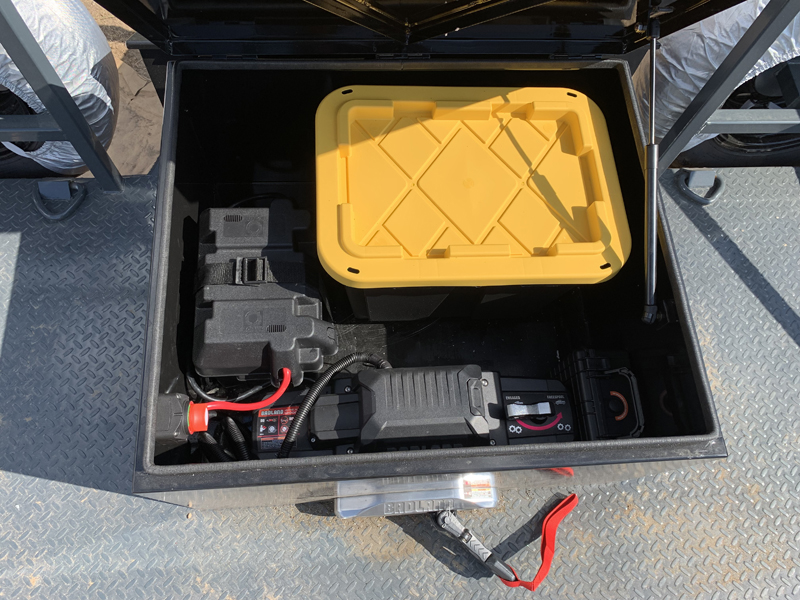
31 July, 2021 Trevor and I spent the day installing a winch in the new trailer. A decent winch is essential in an off-road trailer; recovery of a broken race car or pre-runner is much easier when you can use a winch to drag the car onto the trailer! We elected to buy a Harbor Freight 12K "Apex" winch - yes, we know it's not the top of the line but we can buy 4 or 5 of them for the price of a single "gold standard" winch and this particular model has good reviews... We installed a deep cycle battery in the same "deck" storage box and will also use it to power the fuel storage tank pump when necessary. The battery can be isolated with a disconnect switch when not in use. A couple of photos:
Everything fits well and leaves room for a plastic storage bin for tie down straps. The battery disconnect switch allows us to isolate the battery when not in use by either the winch or the fuel pump. We added a "doubler" plate under the deck to better distribute the loads imposed by the winch.
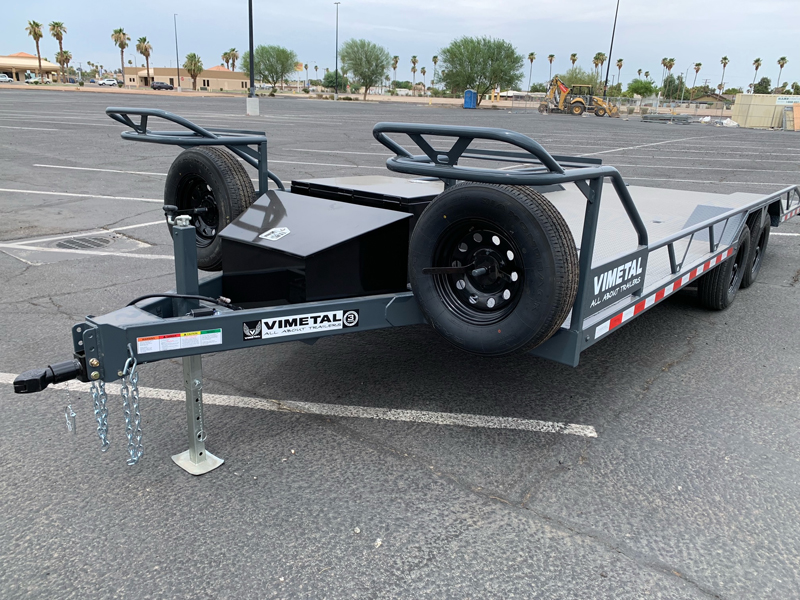
27 July, 2021 Apologies for our absence! It has been a very busy several months with lots of family stuff to take care of, leaving no time to work on the pre-runner. We ordered a "drive over fender" trailer from VIMetal Trailers in Calexico several months ago. Last Saturday, we were finally able to take delivery - we're very happy with the design, construction and features of our trailer; we highly recommend VIMetal Trailers if you need a race trailer!
We're currently finishing up the winch and fuel pump installations - we chose to do those things ourselves rather than have the builder do them for us. They can and will do those things for additional cost but we wanted to save a little money and have control over what components were used and how they were installed. Once the trailer is complete, we'll be back on the pre-runner. Our next project is to select and mount the radiator; there's a bit of engineering to do there. None of the "off the shelf" radiators we've seen will be a "drop in" fit so we'll either need a custom radiator or we'll need to modify something generic...
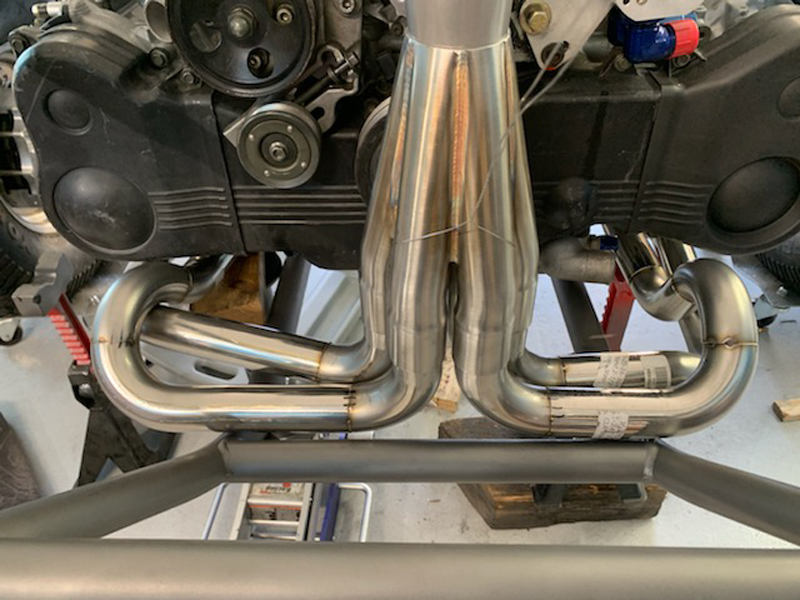
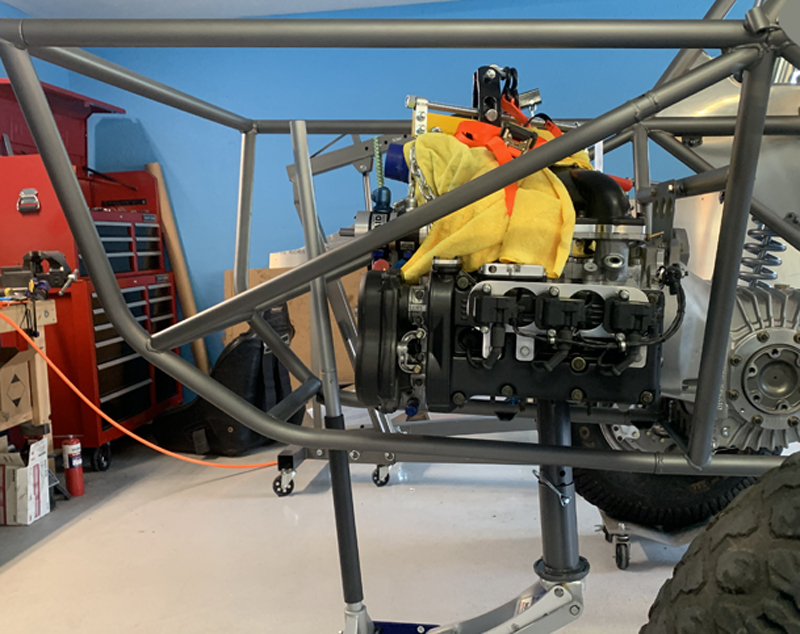
12 June, 2021 Trevor has been working on the exhaust system all week, it's all done and he spent today installing it on the car. It's a bit of a puzzle fitting the exhaust around the bumper, engine mounts and engine accessories but he got it done.
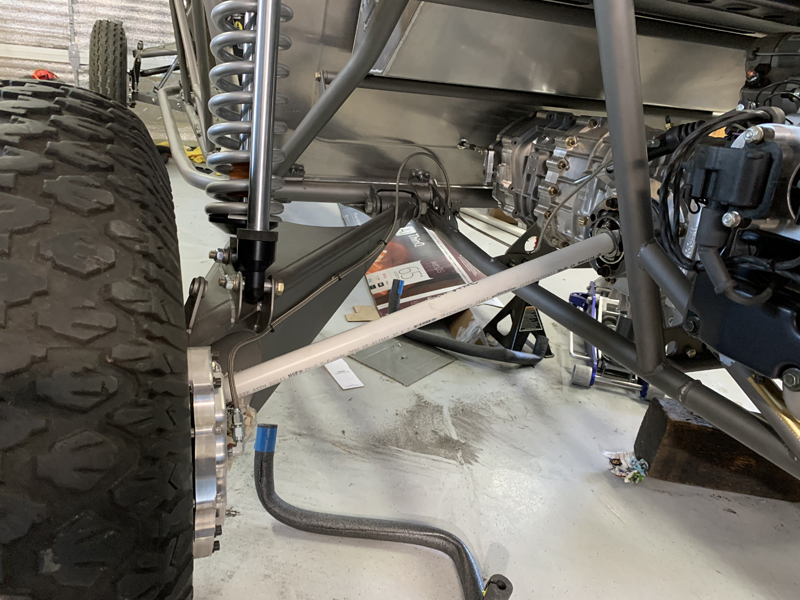
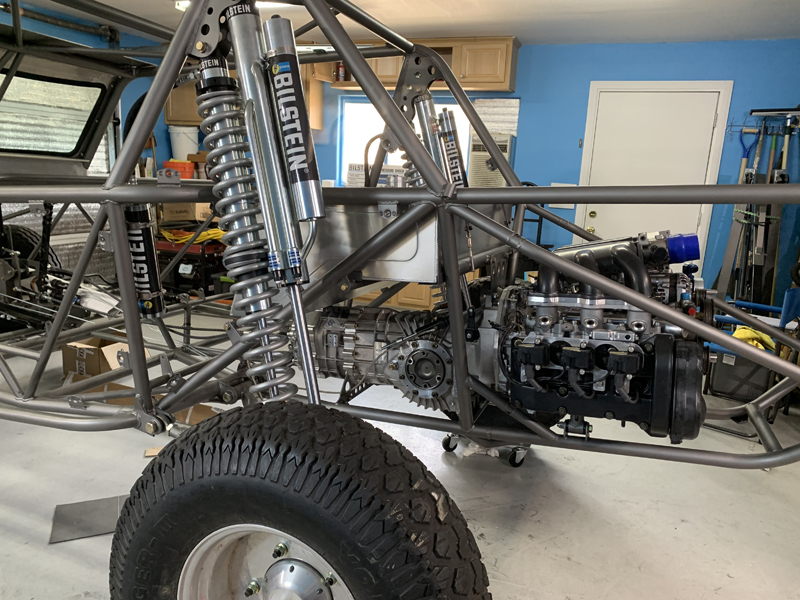
I spent today measuring for axles; with the transaxle side CV's bolted up, we're able to simulate axles with a piece of PVC pipe. Then, we disconnected the shocks and spring carriers so that we were able to cycle the suspension from "full droop" (25 degrees of axle angle for CV longevity) to "mid-travel" (axles horizontal) and measured at each. The left and right sides were slightly different but we'll be able to use a single length axle for both sides without issue.
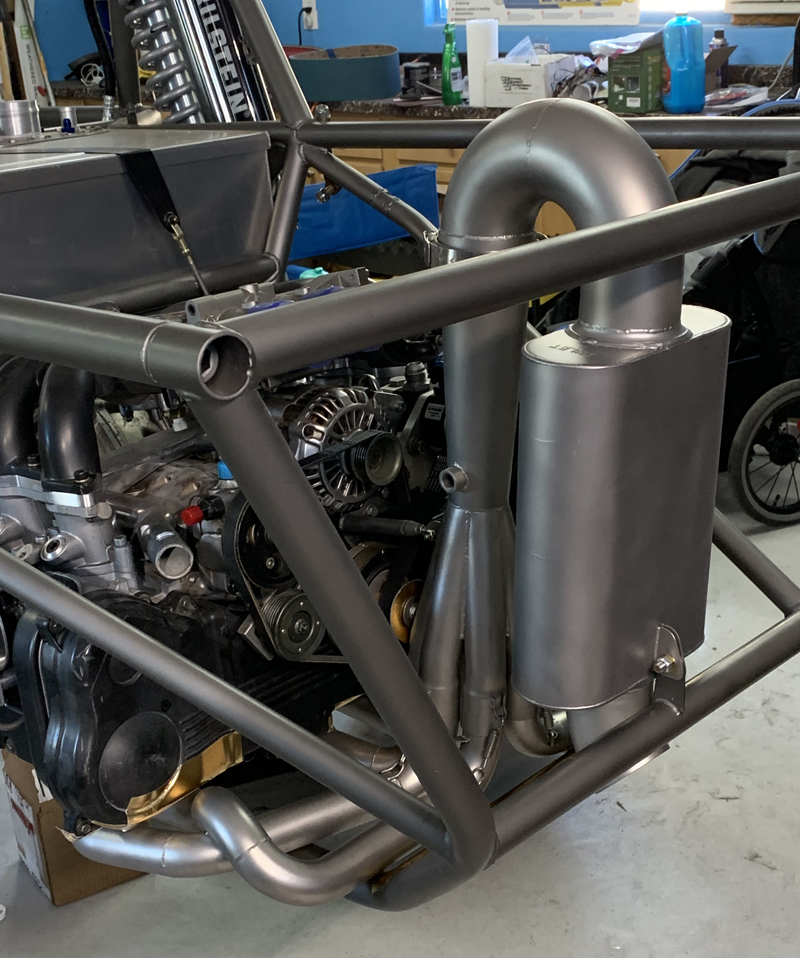
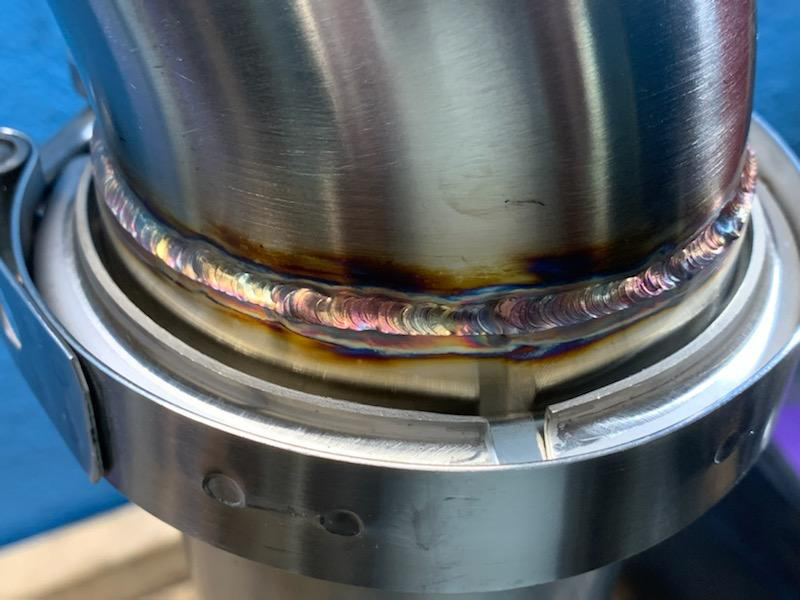
06 June, 2021 When welding stainless steel tubing, it's helpful to provide an internal "purge gas". Our existing single output regulator didn't make that easy to do so we ordered a "dual flow meter" regulator for our TIG welder. It arrived on Friday so Trevor is now able to purge the inside of the exhaust tubing with Argon when welding. The internal "shield gas" reduces a "powdering" effect on the inside of the tubing adjacent to the exterior welds. Trevor completed most of the welding yesterday; here are a couple of pictures:
29 May, 2021 Trevor continued working on the exhaust system this week; he has it all tacked up and ready to weld. We're awaiting the arrival of our new dual output flow meter for our tig welder so we can add an argon "purge" to the inside of the headers as Trevor welds them up. Hopefully, we should have it by next weekend. In the meantime, Trevor will continue fine tuning the fit of all the joints and tacking it all securely. I finished up the install of the gas pedal - there was a little fabrication involved to stiffen the floor in the area of the pedal. It's time to begin planning the routing and measuring for the throttle cable. Next, I started trying to measure the drive axle lengths we need. I didn't get far because Trevor needed the chassis to be still while he was working on the exhaust and I needed to jack it up to remove the shocks to allow the rear trailing arms to move freely through the full range of travel while I measured. There are two important measurements we need: the maximum allowable total length of the axle (at mid-travel, when the CV's are at the same height) and the minimum axle "clip to clip" length to get full travel (full "droop" and full "bump"). Ideally, we need the transaxle CV's installed to measure the minimum axle length so I guess we need to get some on order...
21 May, 2021 Trevor has been working on building the exhaust system for the last several days - he has it all tacked up and looking good now. It was a challenge to get all the tubes routed to the collector while keeping them the same length and staying inside the cage perimeter! I worked on some little things today; fitting the starter, mounting the gas pedal and clearancing the rear firewall for the shift cables. Little things, but they needed doing...
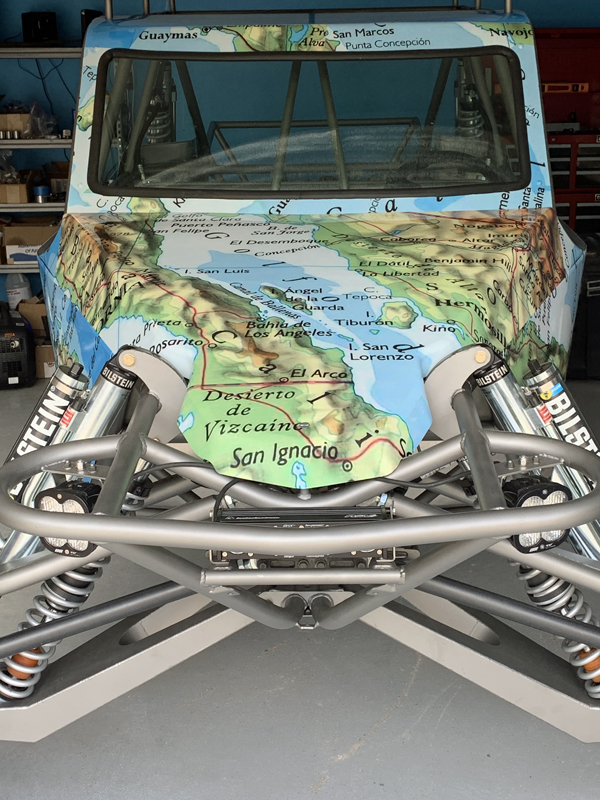
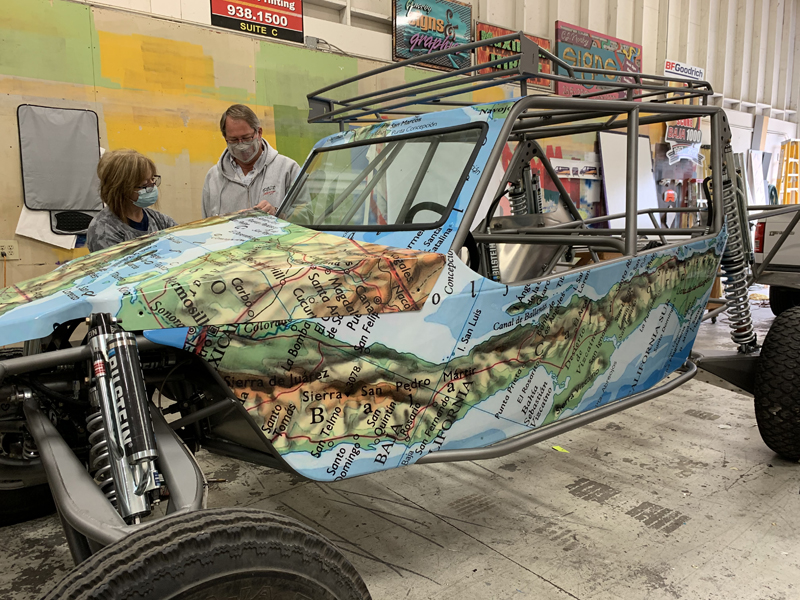
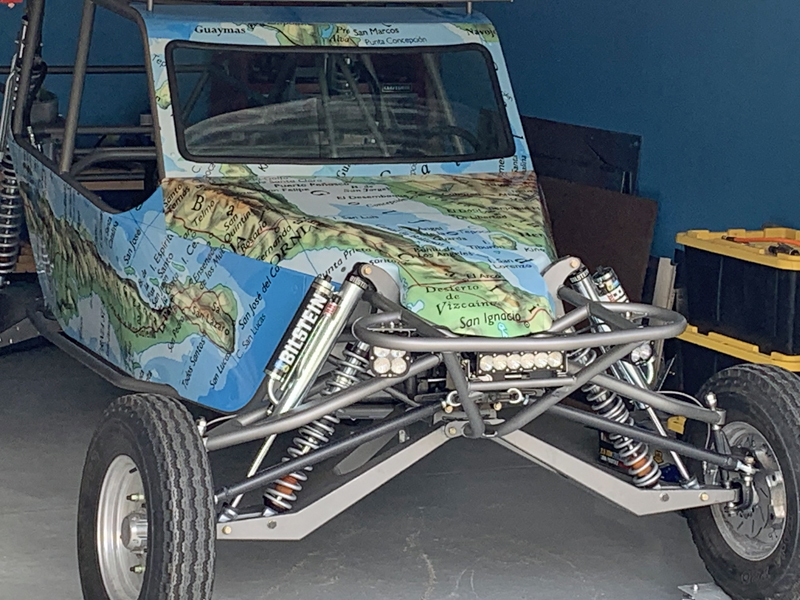
19 May, 2021 Trevor and I made the decision to debut the Pre-Runner "Wrap" today. We've been holding off showing the final look in the hopes that by doing so, we'd be the "first" to do something like this. We've never seen another car with a similar look (though there may be another we didn't find). We understand that keeping it looking good while running around in the desert will be a challenge... Here it is:
As you can see, our pre-runner has a Baja California theme!
16 May, 2021 This was a "machine shop" day for us; Trevor needed to mill the EG-33 exhaust flanges for the larger diameter tubing we'll be using and I needed to turn our starter mount flange on the lathe to fit the transaxle starter mount hole. The High-Torque starter we purchased didn't quite fit into the mount location on our transaxle bell housing - an example of cumulative tolerances causing trouble. I think the bell housing starter mount hole was slightly undersize (0.005") and the OD of the starter mount plate was a bit "out of round"; it was easier to take a few thousandths off the starter mount flange OD than to open up the hole in the bell housing... It's important to keep the ID and OD of the mount flange concentric; the lathe makes that easy. Both jobs could have been done with hand tools but the mill and lathe are so much faster and accurate. I suppose our solution could cause a bit of trouble if we ever have to replace the starter in the field but as long as we use the same brand starter, we can just swap the mount plate to the new starter (2 screws) and bolt it up.
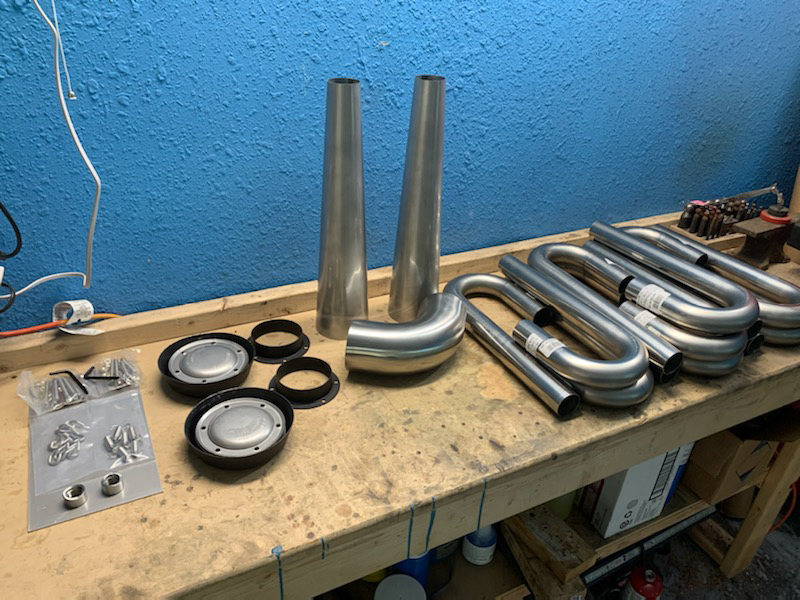
13 May, 2021 We didn't have a pre-runner work day last weekend; I had to go to Baja to take care of some business related to our house at Bahia Santa Maria. Trevor spent some time on Saturday and Sunday designing and creating an exhaust system "mock-up". He's decided upon a 6 into 1 collector with a "V" clamp fitting to allow changing the muffler arrangement at will. He's purchased all the tubing we need and plans to fabricate the exhaust in place on the engine.
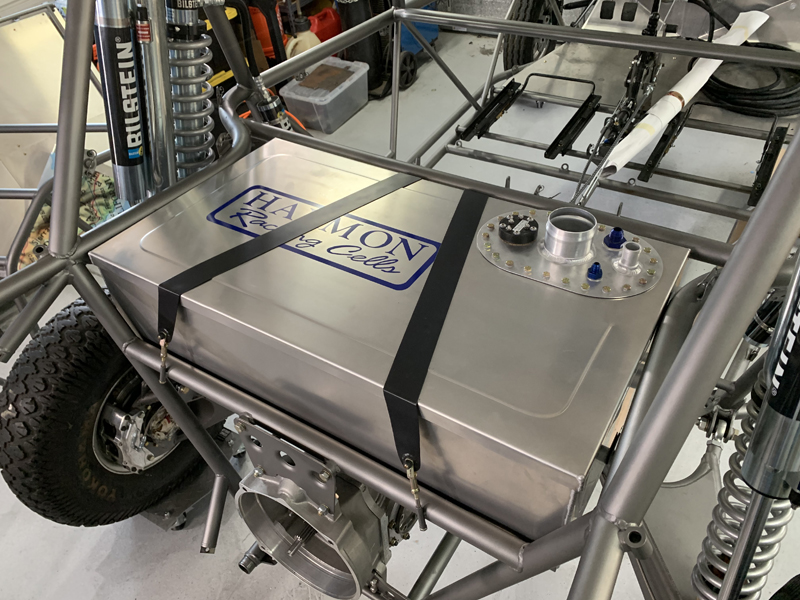
01 May, 2021 Sorry there wasn't an update last week - family matters intervened... Today, Trevor and I finished the fuel cell install - that allowed us to "final install" the transaxle and engine also.
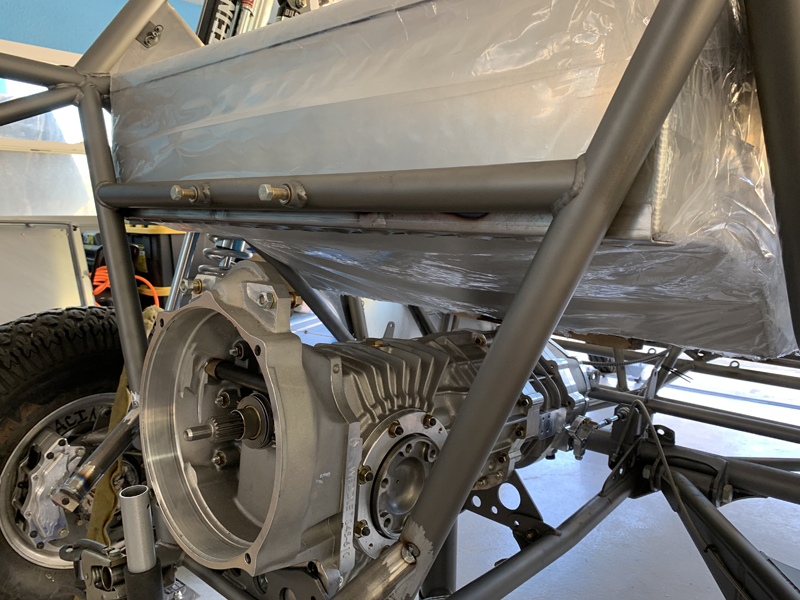
17 April, 2021 We made good progress on the pre-runner today; the fuel cell support structure is done and the hold down straps are nearly complete. Unfortunately, I didn't get any photos of the work today but I'll post some next time. Basically, the fuel cell fits very snugly above the transaxle and behind the rear firewall - we need to un-bolt the transaxle and lower the "nose" section to allow the fuel cell to be rotated into position. Once there, it's supported by a rear "shelf" and two "cross bars" - one at the front of the fuel cell and one between the shelf and the front bar. The cross bars are removable - again because the fuel cell is a snug fit. The fuel cell had to be installed and removed several times to allow access for welding and then we painted afterwards. The hold down straps are 2" wide 4130 strips bolted to chassis tabs at the front and tensioned at the rear with adjustable fittings. To complete the hold down straps, we need to reinstall the fuel cell; that'll have to wait for our next work day to give the support structure paint some time to dry. Once the hold down straps are complete and painted, we'll final install the fuel cell and transaxle
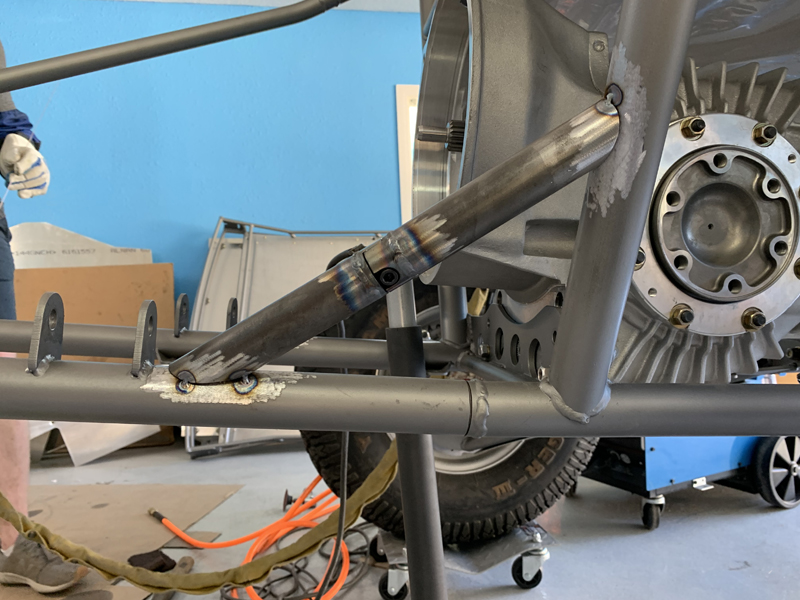
10 April, 2021 Trevor and I spent yesterday working on the pre-runner; we focused on the fuel cell mounting and fabricating engine mount braces. We don't want all the engine weight to be supported by the transaxle bell housing so we added a mount to the rear cage structure. That mount ended up in the middle of a horizontal tube; not the ideal support so we added a removable diagonal for additional rigidity.
03 April, 2021 Sorry I missed last week's
update; I was on the beach in Baja...
I'm back home now so Trevor and I spent most of the day working on the car; Trevor working on engine mounts and I worked on mounting and connecting the shift cables. We both finished our respective jobs for today; the engine mounts are done and the transaxle is hooked up to the shifter and operating normally. Next time, the fuel cell mounts and measuring for axles will be on the agenda...
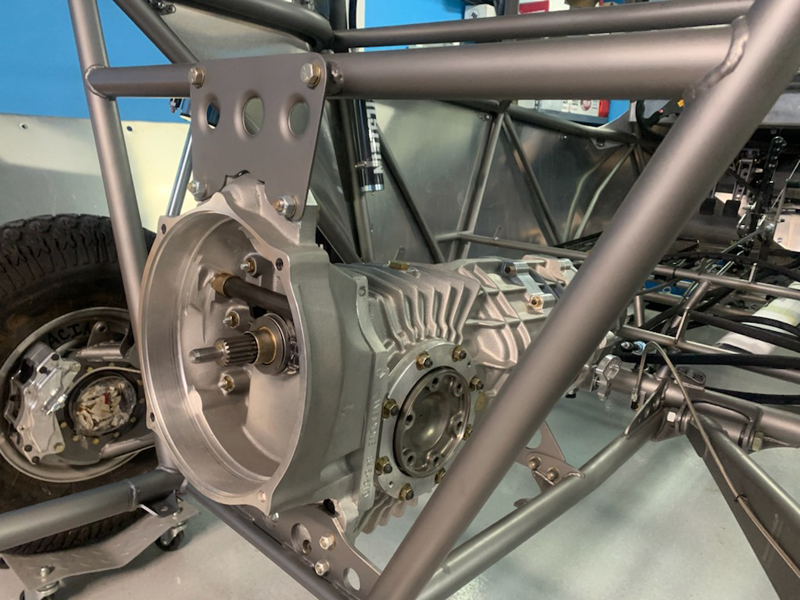
24 March, 2021 I'm out for a week or so; need to go check on our house in Baja... It's been almost a year since we've been able to go, with Covid restrictions and family commitments - we need to go check on it and pay rent. We're hoping to make it a small vacation - but that will depend on the house being in good condition. We'll see. Trevor bolted the transaxle into the pre-runner after work today.
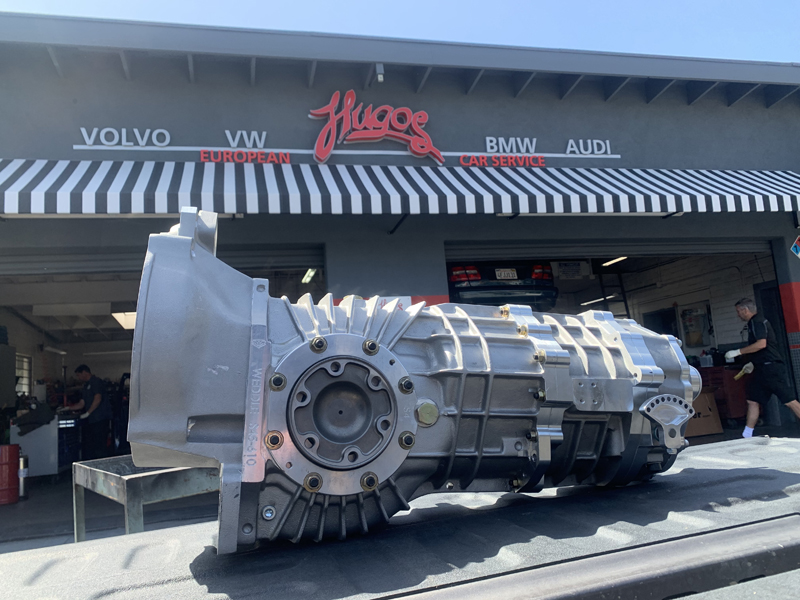
23 March, 2021 We picked up our new transaxle today!
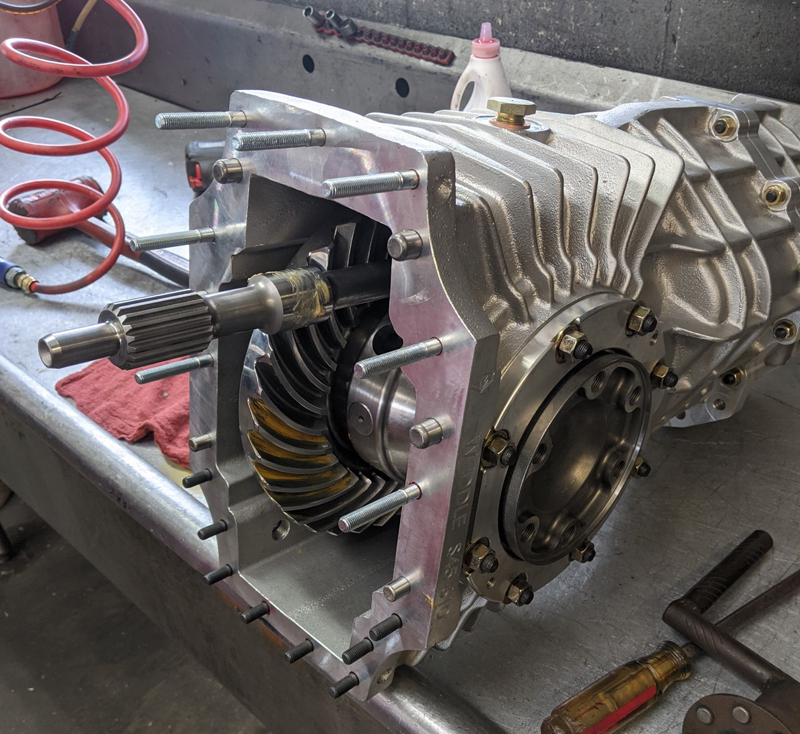
20 March, 2021 Nothing new to report at this point, but our transaxle is done and ready to be picked-up. We're excited to be bringing this home in the next few days; we'll mount it in the chassis and start building up to and around it next. There'll be lots to do including connecting/mounting the shift cables, the clutch slave cylinder, gear position indicator, etc.. We'll also be able to measure for axle length so we can get a pair on order along with the "934" CV's needed for the transaxle end of each.
16 March, 2021 Things are starting to come together - we have the car back from being wrapped and our Weddle S5 transaxle is being built by Rick and Adam at "Power Box". The transaxle is the "Big Ticket" component (aside from the chassis itself) in the build; it required some saving and planning but it's finally coming together for us. Once we have it on hand, we'll install it in the chassis and continue building up to and around it as necessary. There are lots of things that we'll be able to finish up at that point - shift linkages, clutch hydraulics, axles, CV's, etc.. We'll also be able to mount the engine and begin planning and installing all the supporting systems.
13 March, 2021 Today was a big day for us; the pre-runner wrap was completed this week and we trailered it home this morning! To say that we're pleased with the result is an understatement! The pattern is unique; we've never seen anything like it elsewhere and we hope to keep it that way until we're done with the build! As we've said previously, we'll not be posting any photos just yet; we'll wait to unveil the car when it's ready for the desert. Trevor really hit a "home run" with the concept and execution - can't wait for the "reveal"!
07 March, 2021 Not much to report this week; we've been told that our wrap will be completed by this coming Saturday. We're planning to go pick up the pre-runner and return it to the shop at that time. For now, we're in a bit of a waiting game - the car is out of our shop and the transaxle is being built elsewhere... We've been trying to nail down the engine ECU details; we have a nice harness, the ECU is supposed to arrive tomorrow and it looks like most everything is accounted for except a "Wideband Lambda sensor" (O2 sensor). The harness Lambda connector has four wires and we're trying to match the type of connector so we can get the correct harness extension type... It's a bit frustrating to have the car out of our control for so long!
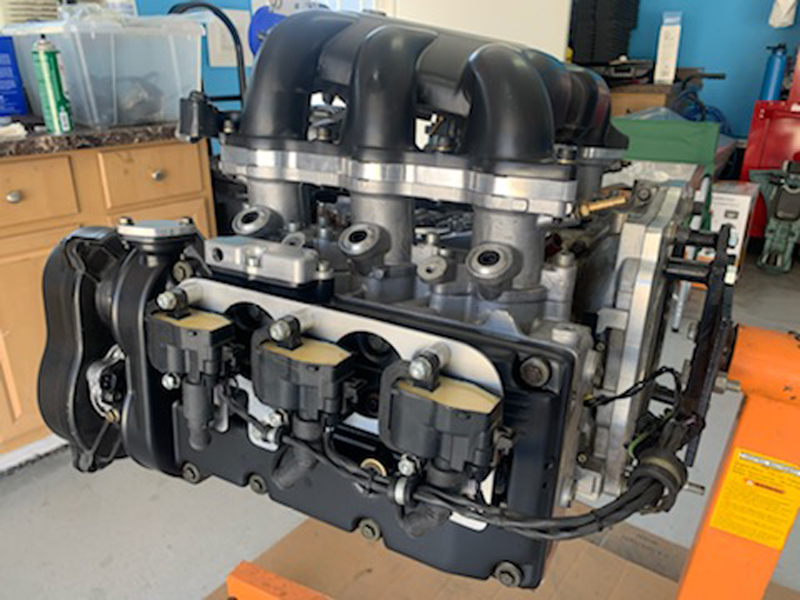
27 February, 2021 Trevor and I have been working multiple pre-runner issues this week; reviewing the "wrap" design, getting a transaxle build started, deciding on an ECU and continuing with basic engine assembly. Trevor spent today continuing the assembly of the engine; he final installed the sump plate and ignition "coil packs". We need to identify the fuel injectors that came with the engine before we install them. This engine was turbocharged previously so the injectors we have may not be correct for our "normally aspirated" build; we're trying to track down the specifications on what we have in hand... We saw a preliminary design for the "wrap" - we liked what we saw and are excited to see the final product soon! We don't have an exact eta yet but hope we'll be able to get the pre-runner back soon. As I mentioned previously, we will not be posting any photos of the wrap until the car is essentially done... Sorry. We've been planning to purchase a Weddle S5 transaxle for the pre-runner; it's a big ticket item and we've been saving for the day we need it on hand. That day seems to have arrived; we need the transaxle installed so that we can continue fabricating the basic systems - shifting, starting, axles, etc.. We also need the transaxle installed so that we can mount the engine and begin installing it's supporting systems. We're working with Rick at "PowerBox" for our transaxle; the Weddle kits seem to be "long lead time" items at the moment but Rick has a lead on one for us. We'll probably be held up a bit waiting for a ring and pinion set but at least we'll be moving forward... Our engine did not come with an ECU, but did come with a very nice/complete harness for a Motec M48 (an older but very capable ECU that the engine was previously run with). We've been looking at all the options, including buying a used M48 (no longer offered as new) or starting over with a different brand ECU. There are obviously pros and cons for all the various options - at the moment, we're thinking that the Motec ECU is the way to go as it would simply plug directly in to the existing harness. That seems the least likely to force a whole bunch of other expensive changes but it's an older ECU and we need to find someone to help us with setup/tuning (we have someone in mind, but we need to verify their ability and desire to work with this older unit...).
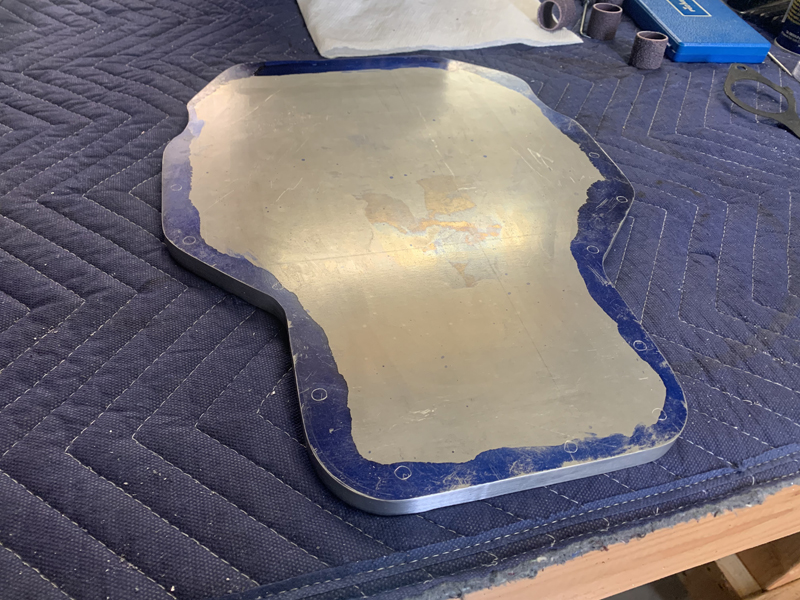
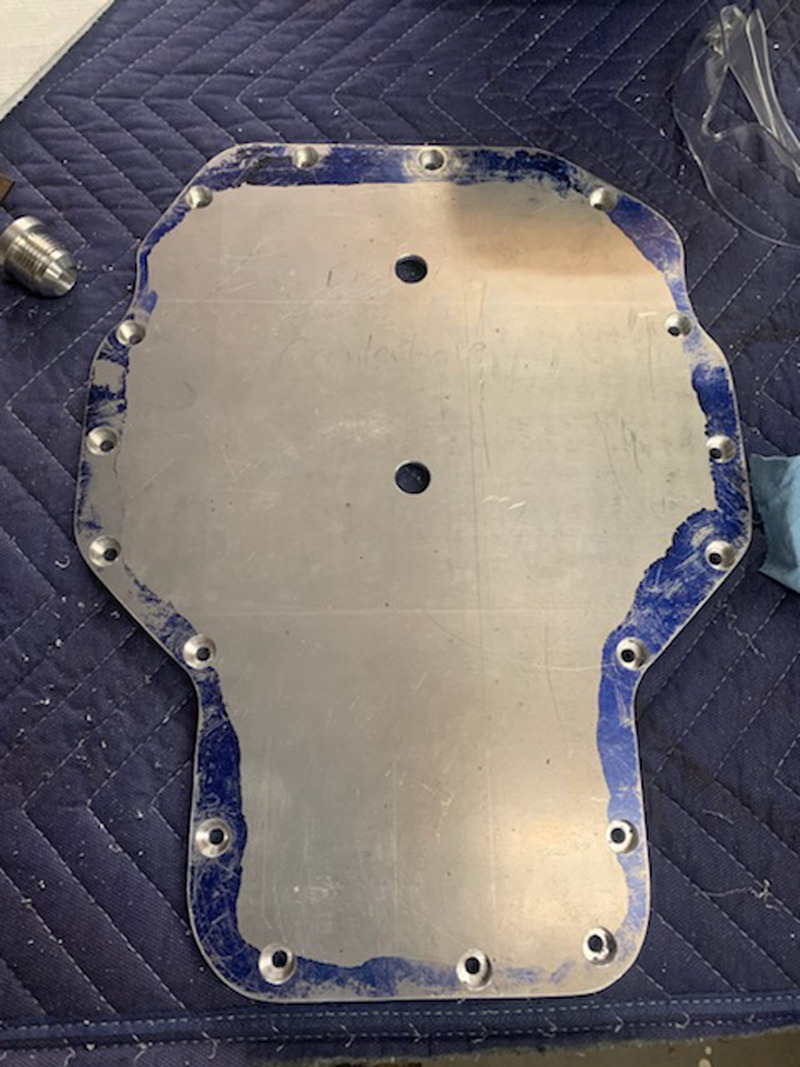
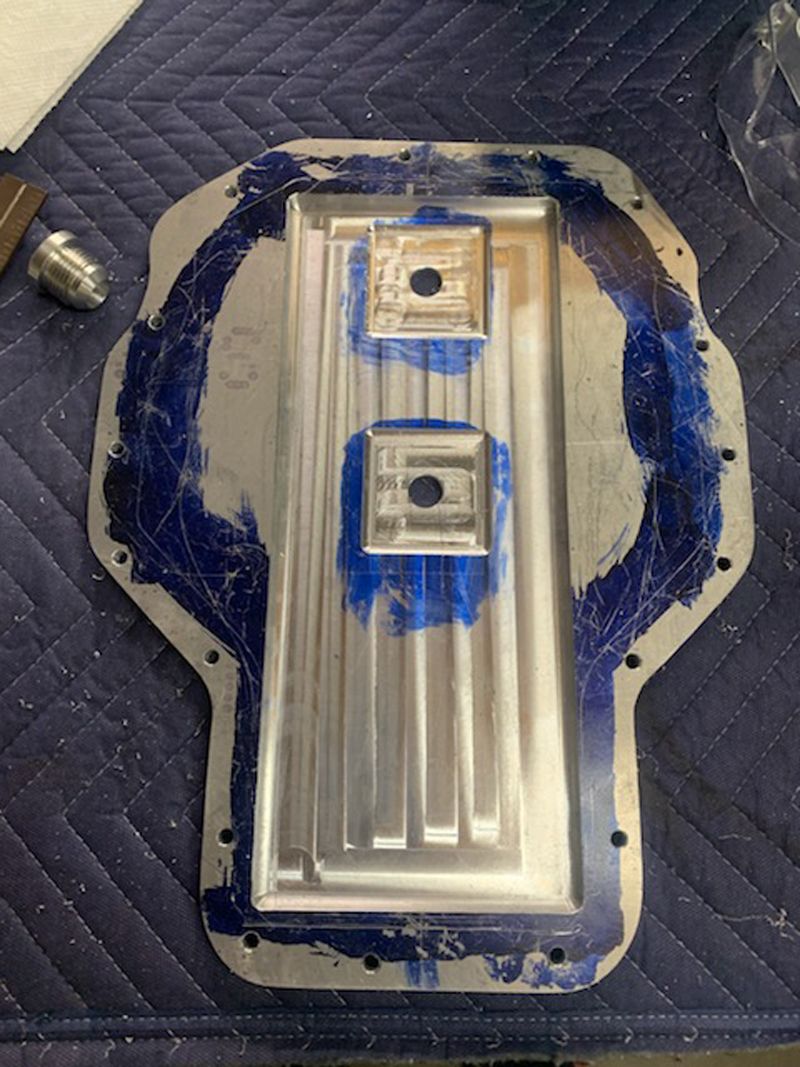
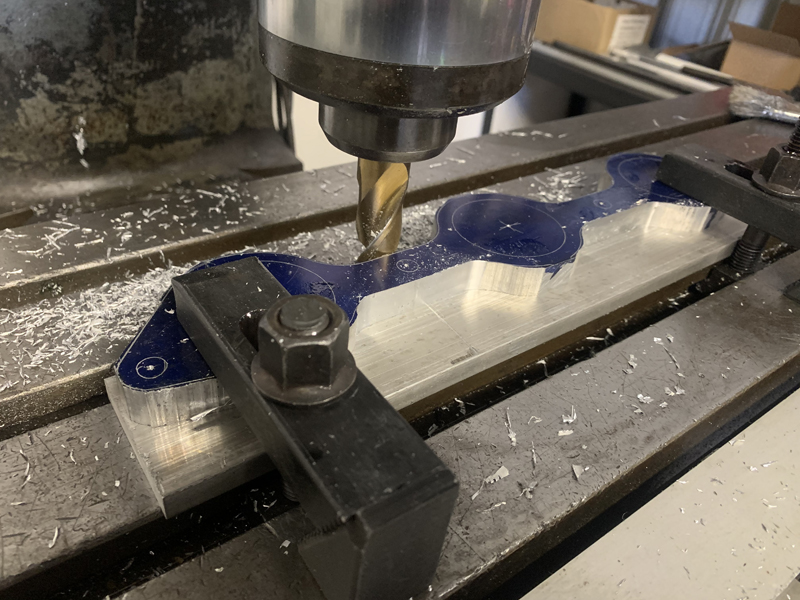
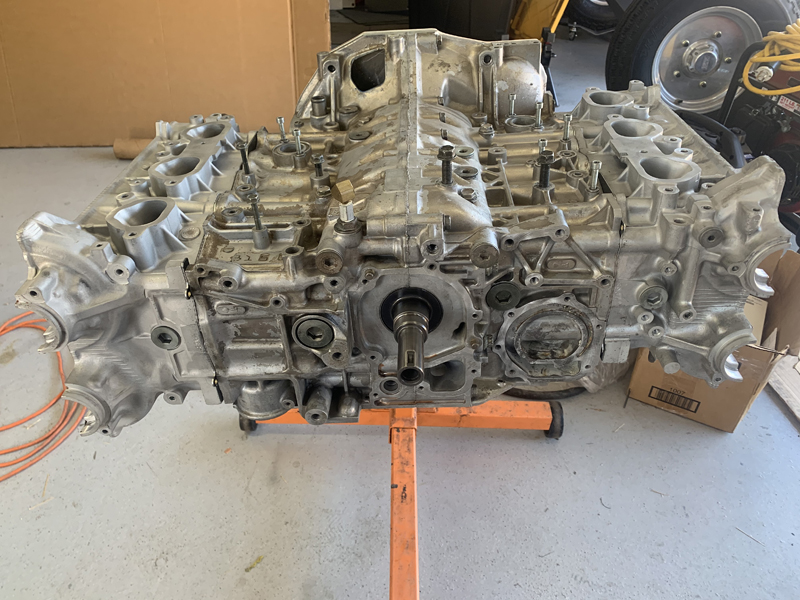
20 February, 2021 Another "machine shop" day; we are converting the pre-runner engine to a "dry sump" configuration; eliminating the stock oil pan and replacing it with a plate that simply closes up the crank case and provides the scavenge pump oil pick up location. There were some areas on the "inside" face that needed to be milled in order to provide a path for bearing oil drainage and we also wanted to mill a slight "sump" into the plate to allow oil to be directed towards the actual scavenge fittings. We began by drilling the sump plate to engine mounting holes, then counter-bored them so that we can recess the bolts. Following that, we turned the plate over and milled the inside face features. All that remains to be done is to weld the AN connection fittings in place.
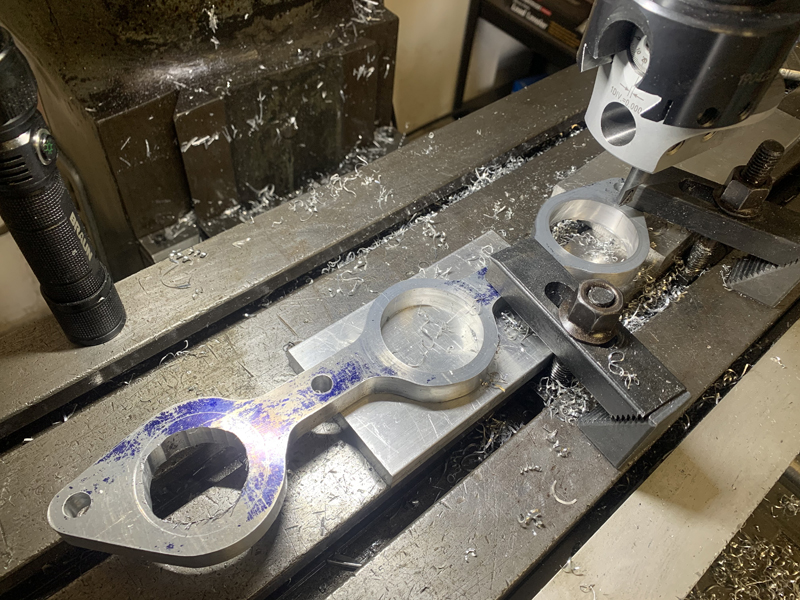
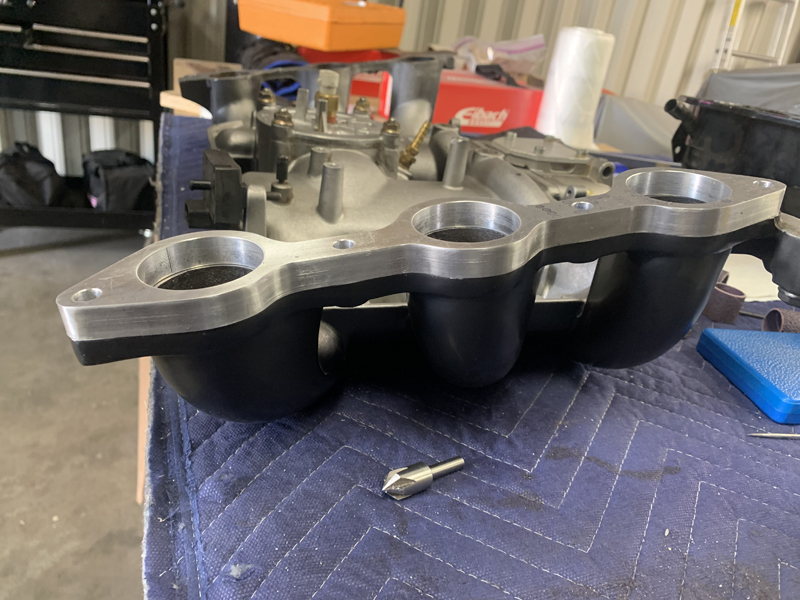
13 February, 2021 Today was a "machine shop" day; we needed to fabricate intake manifold spacers for the pre-runner engine. Our installation requires us to rotate the intake manifold 180 degrees from stock, causing a slight interference issue with the alternator. By raising the manifold 1/2", we are able to solve the problem - but the needed spacer is not readily available... We are fortunate to have a Bridgeport mill in our shop; we put it to good use today.
06 February, 2021 Today was a big day for the family: our grandson's first birthday party. With the threat of Covid still present, the party was mostly "virtual" but the few invitees were masked and social distanced... We all had fun and it was a memorable event. Following the party, Trevor and I met at the shop for a little work on the pre-runner. We need to fabricate a few things for the engine: a plate to replace the oil pan for our "dry sump" conversion and some spacers for the induction manifold to allow us to install it "backwards" without interference with the alternator. We're using 1/2" aluminum plate for each so we began the process of cutting "blanks" for each of the needed parts. Our small band saw was not up to the task so we'll need to head to my brother's shop (Custom Aircraft Parts) to use his... Once the blanks are cut, we'll mill them to final shape: we primarily need the induction spacers right now so we can finish the basic engine assembly. We'll work on the "dry sump" conversion once the basic assembly is complete.
30 January, 2021 Trevor trailered the pre-runner to the "wrap shop" today; he's been working with them for quite some time to design the wrap. The recent winter storms complicated the move a bit - icy roads were a concern but all went smoothly and the car is now out of our hands for a while. We expect the wrap to take some time; no clear delivery date was mentioned though we tried... We are not planning to make the wrap public until the car is nearly done; we're excited about the design and a bit concerned that someone will copy our design before our car is finished... When we're near completion, we'll post photos.
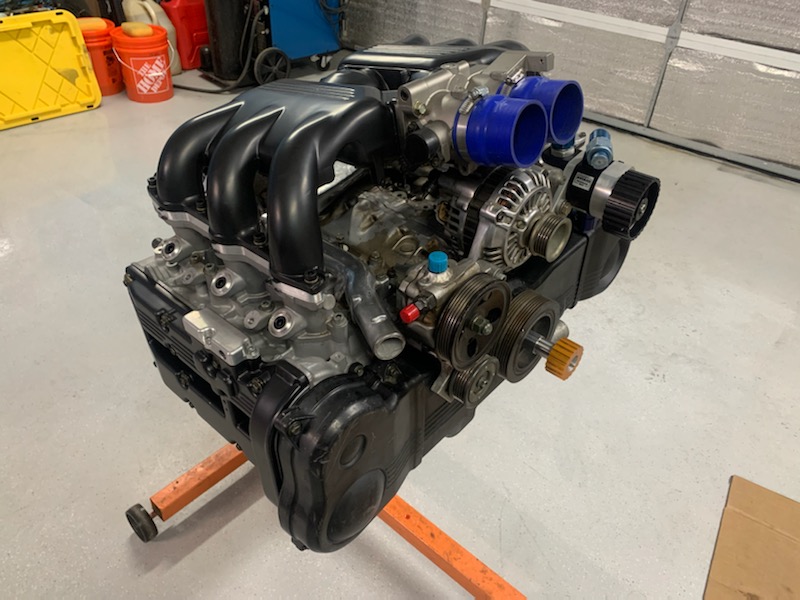
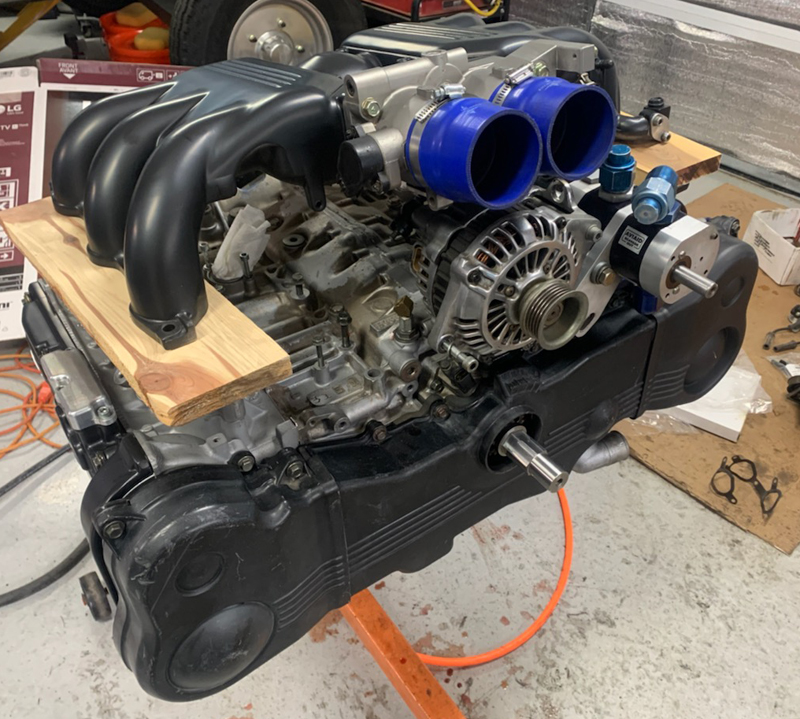
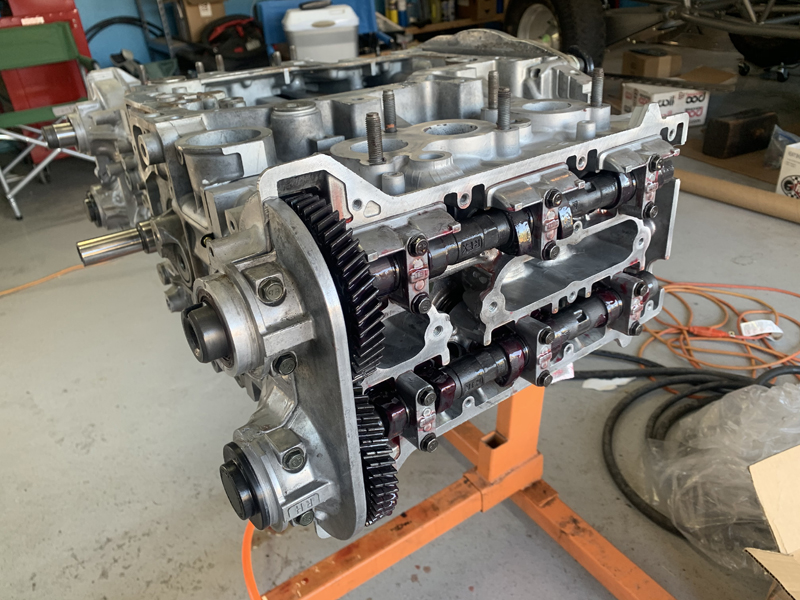
23 January, 2021 Spent part of today installing the Subaru EG33 valve timing belt components - all the idler pulleys, drive gears, belt covers and the belt. Everything is now assembled and "timed" correctly; the engine rotates smoothly with no interference issues - a huge load off our minds! Trevor mocked up the intake manifold and accessories so that we can see what changes need to be made in order to "clock" the intake manifold 180 degrees from stock. We need to orient the intake in this way in order to allow a "rear engine" installation without interference with the transaxle mount and fuel cell. This is commonly done but generally requires relocation of the alternator - unfortunately, we can't move the alternator because the "dry sump" pump will occupy the space in which it's normally relocated... We need another solution for the alternator/intake manifold interference issue then; it appears that the installation of a 1/2" spacer between the manifold and the engine will solve the problem. We'll have a closer look next time and measure accurately so we can fabricate what we need.
16 January, 2021 Another pre-runner work day today. Trevor spent part of the day cleaning and painting the engine valve covers and intake manifold. The remainder of the day was spent prepping the aluminum body panels for wrap/paint. We chose to use a process commonly used on aircraft - an etching solution followed by an "Alodine" conversion treatment. Once etched, the Alodine solution "converts" the surface of the aluminum, providing corrosion protection. Afterwards, the panels can be left raw, painted or wrapped. The corrosion protection provided by the Alodine is enough to protect them by itself but we'll be painting some, wrapping others and leaving some raw.
10 January, 2021 Trevor and I spent yesterday continuing the assembly of the pre-runner engine. During the periods when Trevor didn't need any help, I began the process of prepping the aluminum body panels for being painted or "wrapped" (that's a three step process: 1 - de-grease wash, 2 - acid etch and 3 - Alodine conversion coating). I completed step 1; the next time, we'll do steps 2 and 3.
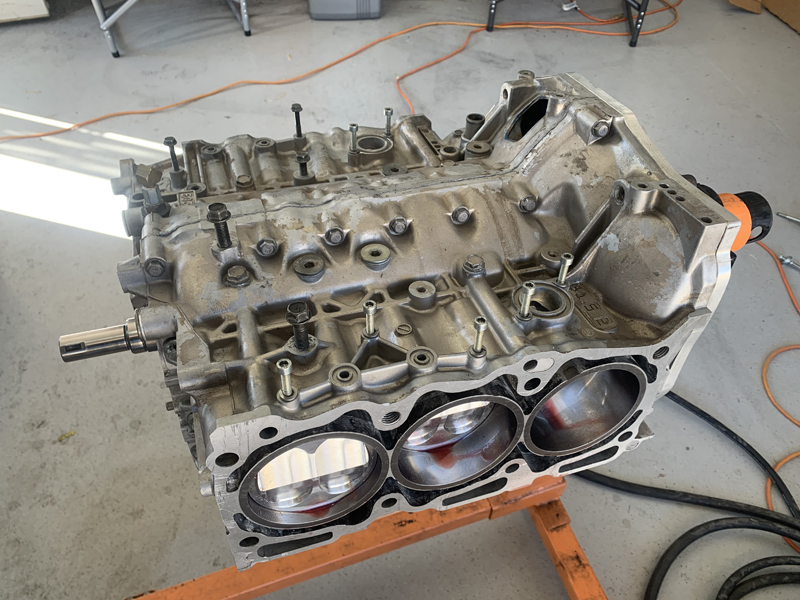
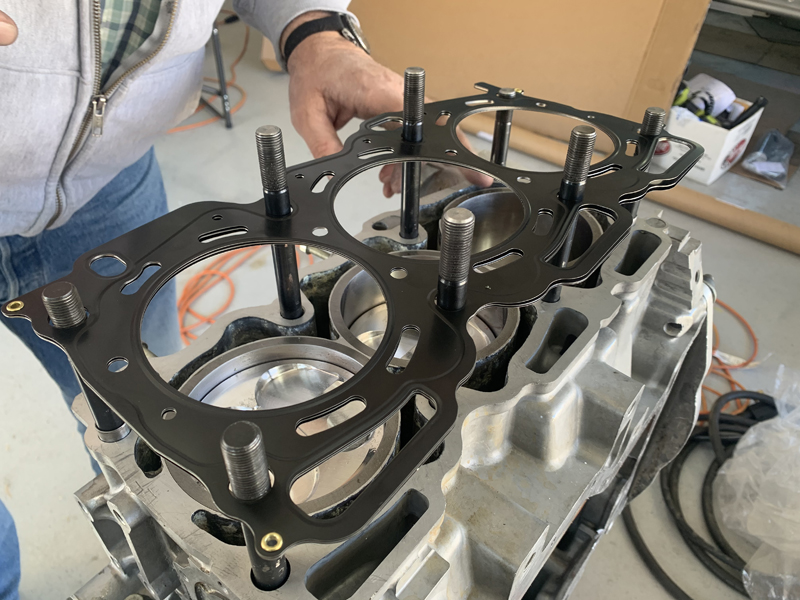
01 January, 2021 Happy New Year! We hope everyone has a better 2021 than was 2020 for so many! We spent today continuing assembly of the pre-runner engine; It never ceases to amaze me how what should take an hour usually takes two or three times that long.... Trevor spent some time during the week cleaning parts so that we'd be ready to go today. That was helpful but there were still things that slowed us down - we basically got the short block installed on the engine stand, the head studs and gaskets installed and the heads loosely bolted in place. There were many little details that required attention before we could accomplish the "big" things, slowing progress considerably. We wanted to get more done today and we're probably just being overly cautious in some ways but we want to "do it right"...
|