|
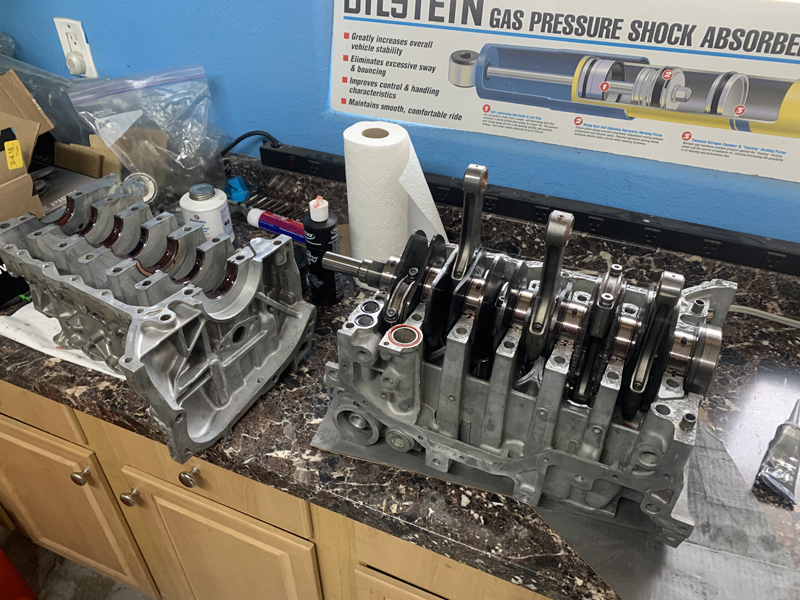
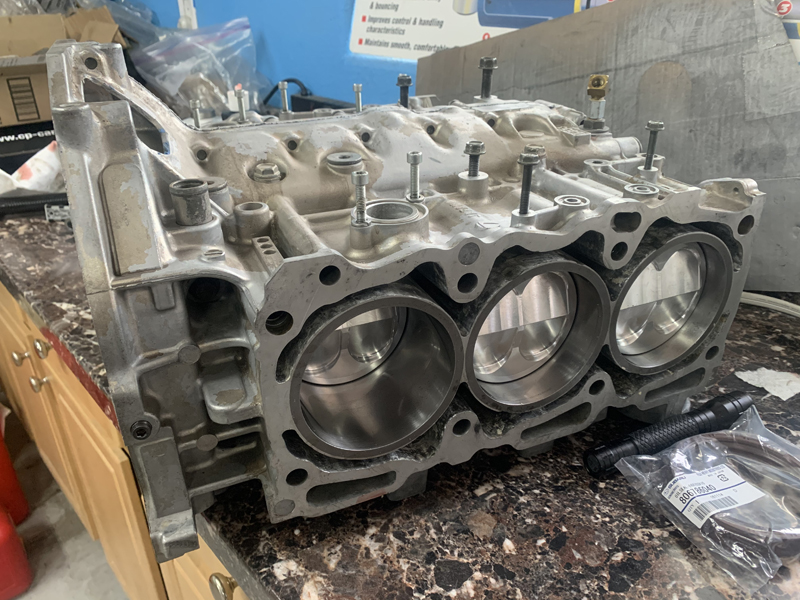
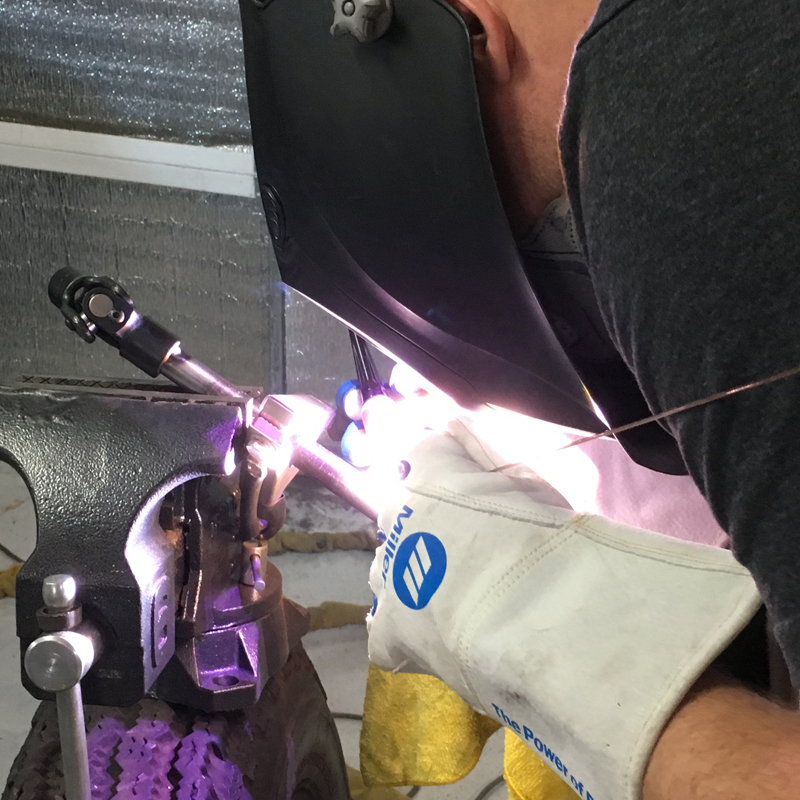
24 December, 2020 Trevor and I worked a short day on the pre-runner last Saturday; we now have the engine in a true "short block" configuration. We had to fabricate some tooling to install and secure the remaining "center piston" wrist pin and retaining clips but once completed, the assembly went fairly quickly. The engine rotates free and smooth; the remaining tasks are essentially "bolt on" jobs and should go quickly. We're converting the engine to a "dry sump" configuration so there may be a little problem solving to be done there but otherwise, we don't anticipate any issues. Our goal is to complete the mechanical assembly/conversion, then deliver it to Danzio for its ECU and tuning. Before I arrived, Trevor had already fabricated one of the special tools needed for assembly and had also welded a portion of the fuel cell rear support structure - there's still a bit of work to do on it. Our fuel cell is still out for re-work; hopefully we'll have it back soon after Christmas and can get going on the installation.
12 December, 2020 Finally, we're able to begin the reassembly of our engine! Trevor and I spent a full day building the engine up to nearly a "short block" configuration. We have to fabricate a couple of special tools to go any further: 6-cylinder Subaru motors require that the center cylinder piston wrist pins be inserted after the case halves are bolted together and a long "insertion tool" is needed for that... There's also a special tool needed for installing the wrist pin retaining clips for the "center" cylinders - I'll be fabricating those tools at the shop this week. Here are a couple of photos of today's progress:
06 December, 2020 No pre-runner assembly work getting done at the moment; we've been chasing engine parts, fuel cell and vehicle wrap issues... We had intended to be assembling the engine while awaiting our fuel cell but once our new (custom) pistons arrived, we discovered that we had to rework the connecting rods to fit the new wrist pins. We finally have the rods ready to go so we can begin engine assembly (next weekend). We picked up our fuel cell from Harmon Racing Cells the week of Thanksgiving; they do beautiful work! Unfortunately, we discovered that we need to modify the shape of the fuel cell a little bit (our fault, not theirs) so I returned it to them on Thursday and hope to have it back by Christmas. We'd like to get the cell mounting structure fabricated next. Our vehicle "wrap" vendor finally got back to us with a quote (still awaiting a rendering for approval). Once we see and approve the rendering, we'll arrange to trailer the car to them for the wrap. There's still lots of fabrication to be done so we'll remove the wrapped panels and store them safely until final assembly. There won't be any photos posted until the car is done and ready to go....
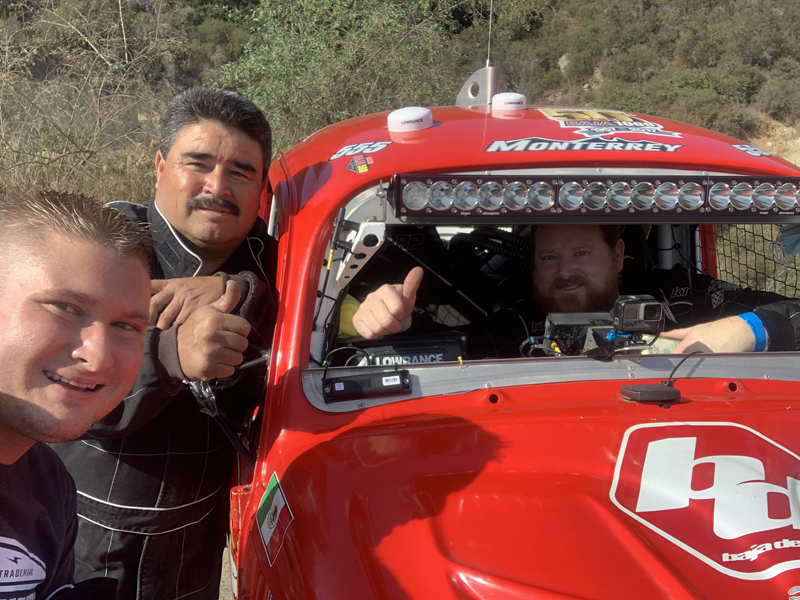
23 November, 2020 Trevor arrived home safely early yesterday morning after a grueling Baja 1000 adventure; he's still recovering from several days of minimal sleep and many hours of driving - common after a '1000.... We haven't had a chance to get his full story yet - we're hoping we can on Thanksgiving day. The one thing he mentioned was that he had an awesome encounter in staging with a 5-1600 entrant; a co-driver for Marcos Nunez with whom we raced in our 5-1600 days. He recognized Trevor, remembered me clearly and asked Trevor to say hi!
21 November, 2020 No progress on the pre-runner this weekend; Trevor is in Baja supporting a Spec. Trophy Truck at the 2020 Baja 1000. He's been all over Northern Baja in the last 24 hours - From Ensenada via Hwy 1 to Camalu then back North to "Observatory Road" and inland to Rancho Melling, back to Hwy 1 then North to "Camino a Lazaro Cardenas" (dirt road through the coastal mountains to "Valle de la Trinidad"), Valle Trinidad then Hwy 3 East to "El Chinero" (intersection of Hwy 3 and Hwy 5) on the Baja East coast, then back to the finish line in Ensenada - all in a 24 hour period! Happy to say that the truck he was supporting finished very well overall and within it's own class. Resting up and celebrating today then coming home tomorrow.
14 November, 2020 Trevor and I spent a couple of hours on the pre-runner today; we're still awaiting delivery of our fuel cell and the return of the engine connecting rods so we had only little projects to work on. Anticipating the return of our re-bushed connecting rods soon, we chose to spend our time adjusting the fit of the rings in the new cylinder sleeves. We found that every one of the new compression rings needed a little adjusting to get the desired end gap - if the gap is too small, the rings will "bind" at operating temperature - causing ring and piston damage. Too large a gap doesn't risk damage but it would allow more "leakage" past the rings. Filing the rings is a "fiddly" but necessary job that needed to be done before final assembly. Trevor is heading to the "Baja 1000" next week; he's chasing for a Trophy Truck team - I'm sure it'll be an adventure!
11 November, 2020 We're still waiting on parts for our pre-runner project; the connecting rods are still out for installation of new bushings, the fuel cell is delayed due to vendor supply issues and our "wrap" vendor hasn't worked up an estimate on our design yet..... To help with the connecting rod delay, I retrieved them from the machine shop and did a couple of the required operations in our own shop then returned them for the final operations. Hopefully we'll have them in hand and ready to install in the next couple of days. The fuel cell manufacturer was waiting on material for the bladder - between vendor delays and then USPS dragging their feet, the projected delivery estimate has gone out the window...... We really don't have much we can do on the pre-runner at the moment as a result. We are planning a short work day for this coming weekend though; there are a few things we can prepare ahead of time for assembly of the engine - we'll get started on them now. Trevor will be supporting a Trophy Truck entry in this year's Baja 1000 so he's going to be busy that week (November 17 - 22) and it'll be after Thanksgiving before we're able to work on the pre-runner again....
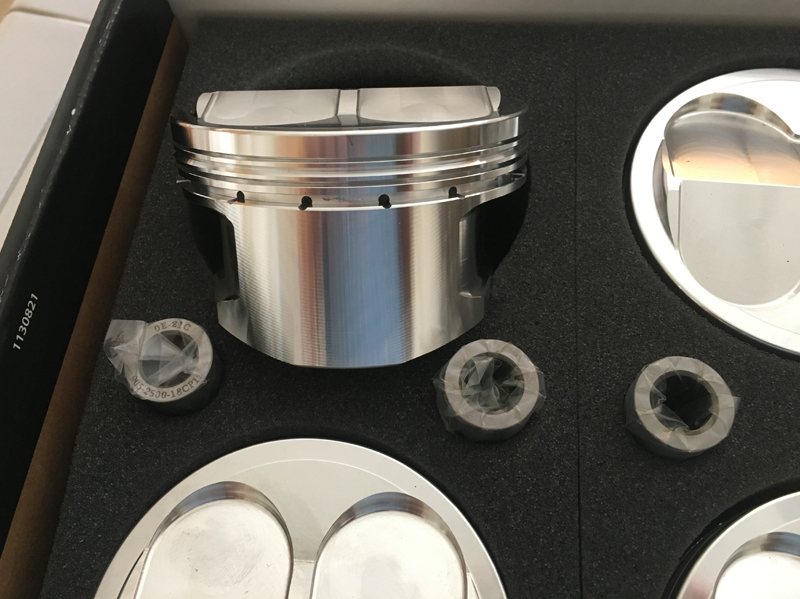
17 October, 2020 We received our new pistons from CP Carrillo this week; they're absolutely beautiful! We've increased the cylinder bore size with new sleeves and upped the compression ratio with a custom piston design. We had hoped to begin the engine assembly today but find that we need to re-bush our connecting rods for the new wrist pins (the old pistons used a different size wrist pin). We've got new bushings on the way and, hopefully, we can get them installed this week and be ready for assembly next weekend.
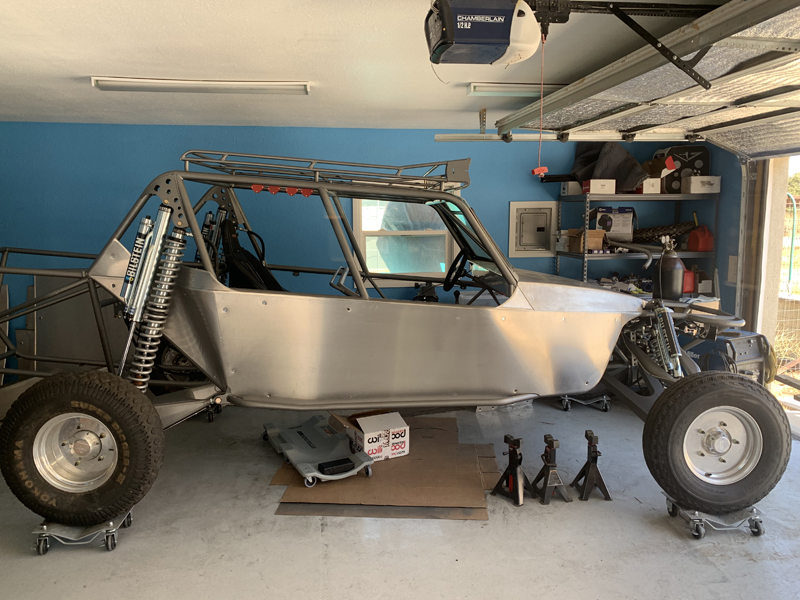
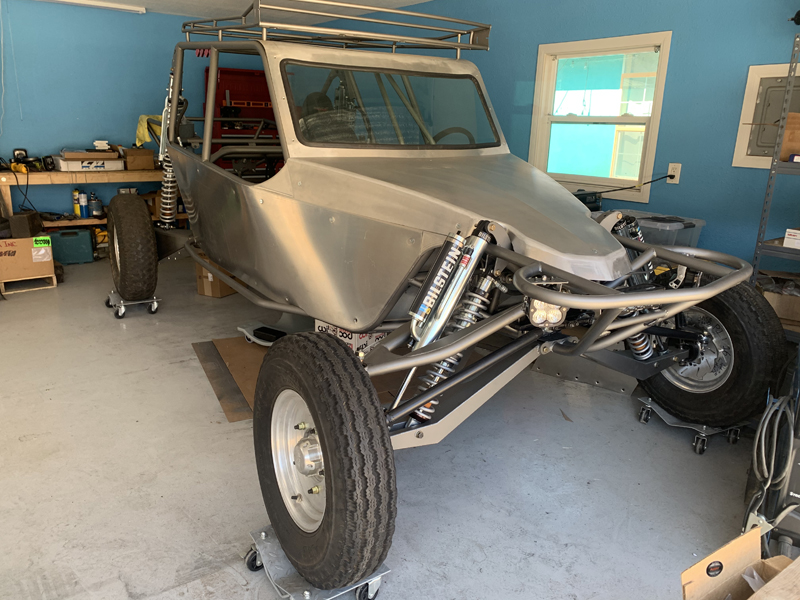
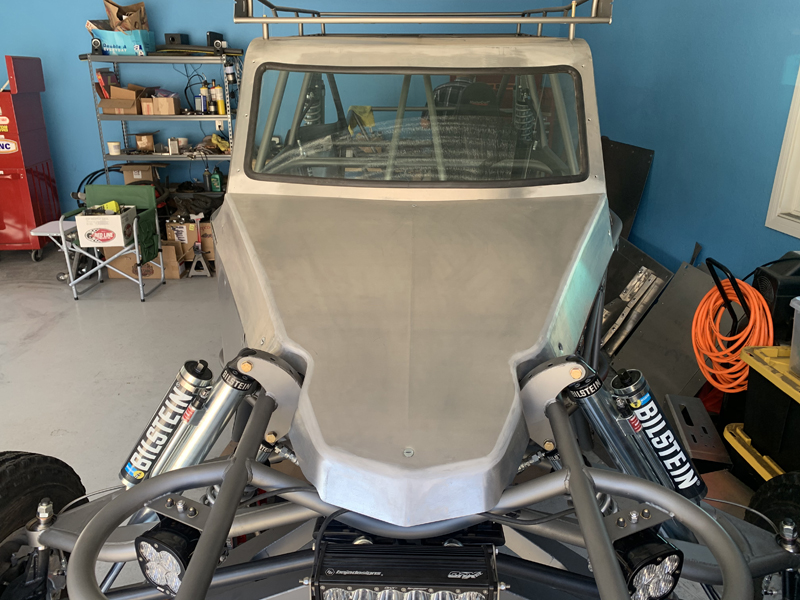
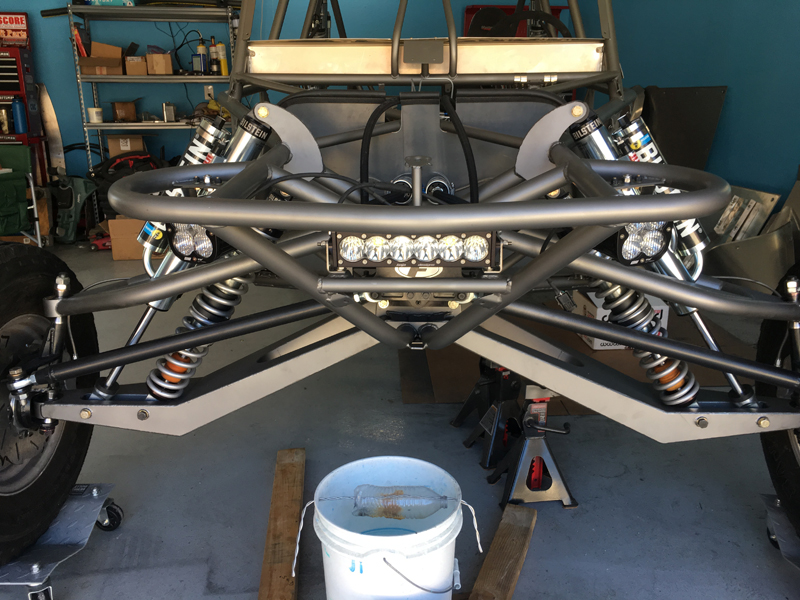
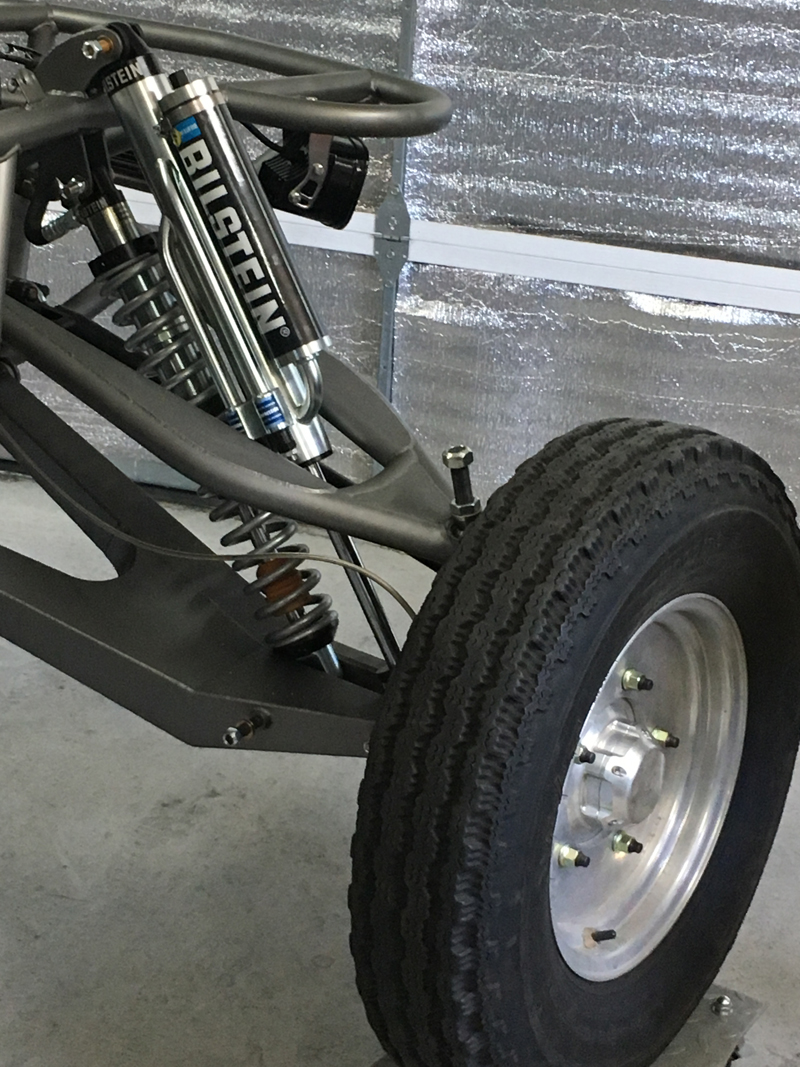
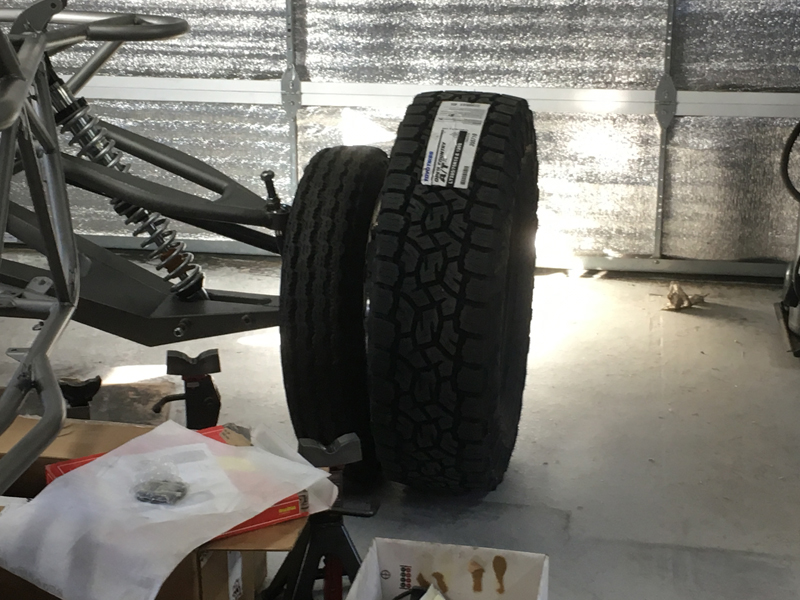
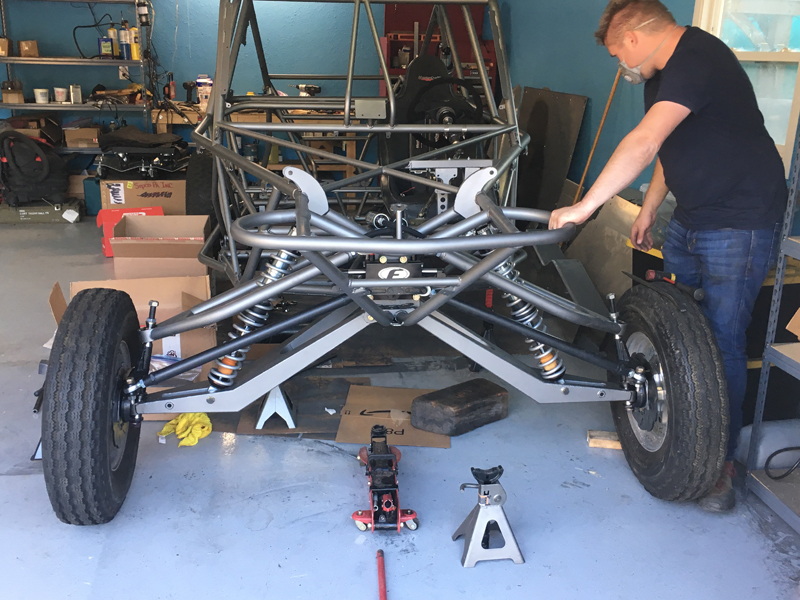
We spent part of today re-installing some of the body panels to document their size and shape for our "wrap" vendor. We have an unusual design in the works - you'll have to wait for the "reveal"..... In the mean time, here are a few photos of the car with the pre-wrap right side body panels installed (yes, we know the wheels/tires are way too small - they're just temporary):
After getting the necessary photos and measurements, we moved on to installing a new water heater in Trevor's house - it's always something......
10 October, 2020 We finally received the last shock we had been waiting on for weeks - computerized inventory control systems are only as good as the data input..... Though all of our shocks showed "in stock" when ordered and picked up, one of the front shocks actually wasn't. That shock had to be built specially for us; of course some of the parts needed also weren't in stock so it took over a month for us to take delivery. We're happy to have it now and spent part of today installing it on the pre-runner. We also spent a little time trimming the length of our front spindle pivot bolts; our front suspension is now complete (less the limit straps). Now, we truly are out of things to do until we have more parts on hand. We expect to have all our engine parts by next weekend and we'll begin the assembly process then - hopefully have it in a "long block" configuration in a couple of work sessions. We're also awaiting our fuel cell order - we expect that to arrive sometime in the next month or so. Once that's on hand, we can fabricate the mounting system and start thinking about a radiator support structure next.
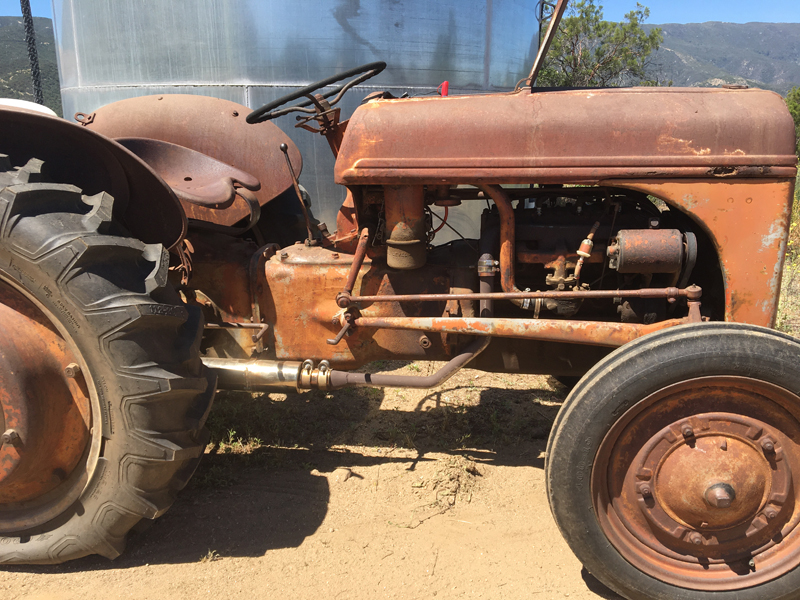
We spent the remainder of the day working on Trevor's tractor - it had a serious fuel leak that we repaired with the installation of a new manufacture fuel sediment bowl/shut-off valve. That took way longer than it should have; the new part leaked worse than the original until we "massaged" it a little - all good now.
04 October, 2020 Another "non-work" day on the prerunner yesterday; we all needed a day off. That's not to say that nothing is getting done; we've started preliminary design of the electrical system while we wait for our engine parts to arrive. We want to account for all the electrical demands before we start building so that we can fabricate a well organized system that meets our known needs and has room for expansion if necessary. I was surprised to see the number of things we need to accommodate! We're planning a two battery system with a disconnect switch that has OFF, BATT 1, BATT 2 and BOTH positions. That allows us some redundancy and flexibility; we can split the electrical system to allow some items to be powered while others remain un-powered. We might want the radio and GPS to be powered while programming or testing while the engine, fuel pumps and fans remain un-powered for example. We'll continue developing the electrical system while we wait for the parts we need to continue with engine assembly.
30 September, 2020 We didn't have our regular pre-runner work day last Saturday; we wanted to do some family things for a change. We're shifting to the engine assembly phase of the project as we've mostly run out of things to do on the chassis for now. We're awaiting the arrival of our custom pistons - we want all the parts on hand before beginning reassembly. Hopefully, they'll arrive in the next couple of weeks. In the mean time, we've also ordered our fuel cell from "Harmon Racing Cells". We've been given a six week delivery estimate so it'll be a while before we can start fitting the support structure for it..... We have some small chassis details to finalize but nothing major until our parts arrive.
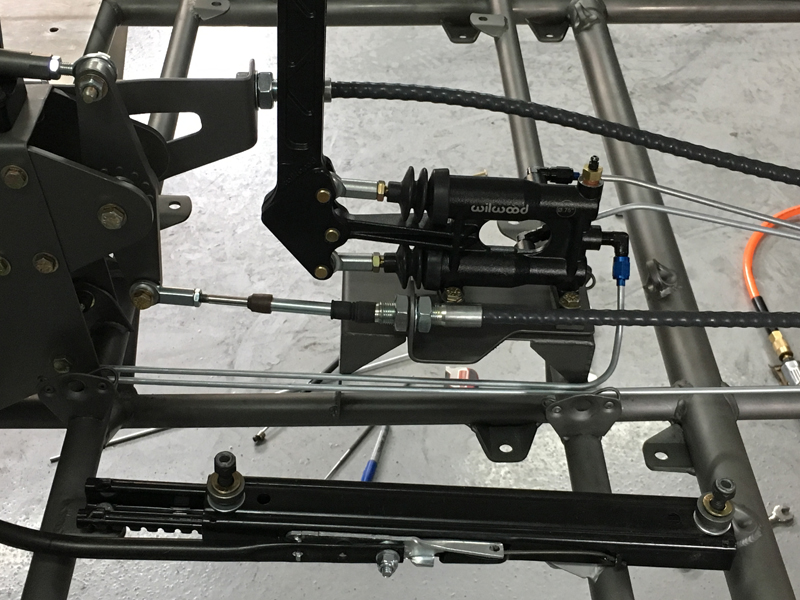
19 September, 2020 This was a "light" workday for us on the pre-runner; we're running out of things to do that don't require us to purchase big ticket items.... We installed our parkng brake "line lock" valve and completed the brake and clutch hard lines, fabricated the steering rack hydraulic lines to the control valve and adjusted the alignment of the shifter cables. We're transitioning back to engine assembly; we have all the necessary components on hand or on order so it's time to start moving along with that to get it to a "long block" state.
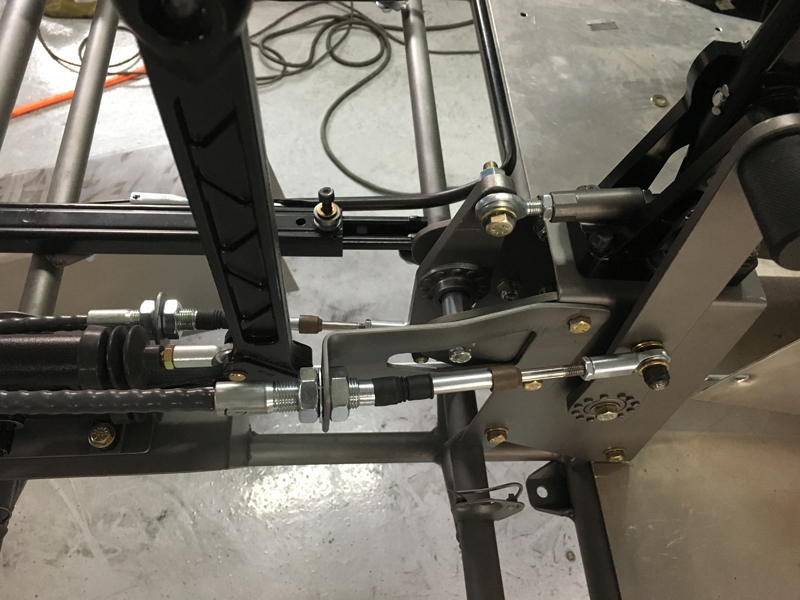
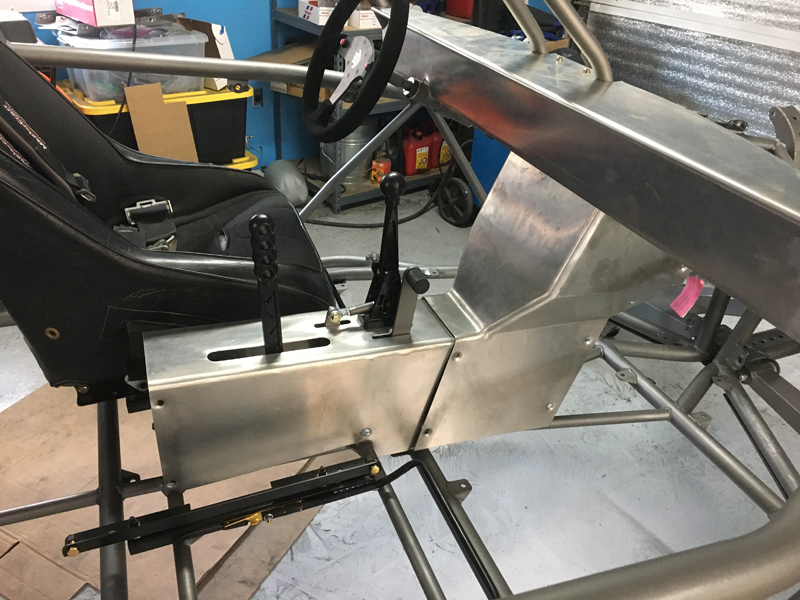
12 September, 2020 Another "regularly scheduled workday" on our pre-runner project. We had an ambitious day planned; we accomplished the "big ticket" items on our list but not everything. We began the day by driving Trevor's tractor over to a nearby neighbor's yard to collect a "brush hog" that he was given; it's perfect for keeping Trevor's "defensible space" clear of brush. That accounted for the first half hour or so, then we were able to hit the pre-runner hard for the remainder of the day. We wrapped up the shifter assembly with the addition of the cable mount brackets I made during the week. They fit just as planned with minor bending of the reverse cable bracket for turning brake handle clearance. After finishing and installing the cable brackets, we continued working on our brake and clutch lines. We've decided to install a ball valve "line lock" in the rear brake circuit so that we have the ability to lock the brakes when necessary (parking brake) - we spent the last few minutes of our work day planning how and where to mount it. Now that we've settled those details, I'll make the parts we need this week. We can can install them and finish up our brake system on our next scheduled work day.
08 September, 2020 I spent a couple of hours fabricating brackets for the shifter push-pull cables today; we need one for the forward gears and one for reverse. The brackets will locate/support the cable housings near the shifter assembly. The forward gear bracket will mount to the turning brake support structure and the reverse bracket will mount to the shifter support assembly. The brackets are a bit oversize for now; we'll trim them to fit more precisely on our regularly scheduled "pre-runner workday", Saturday.
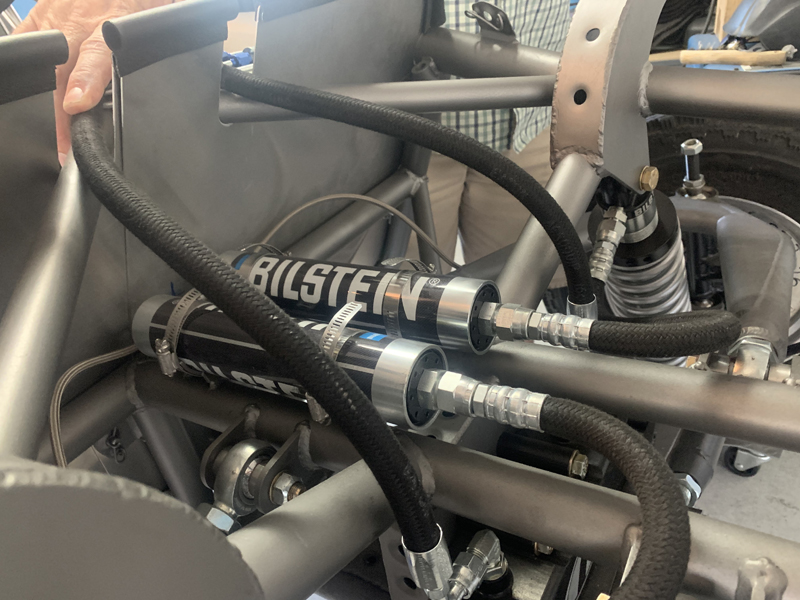
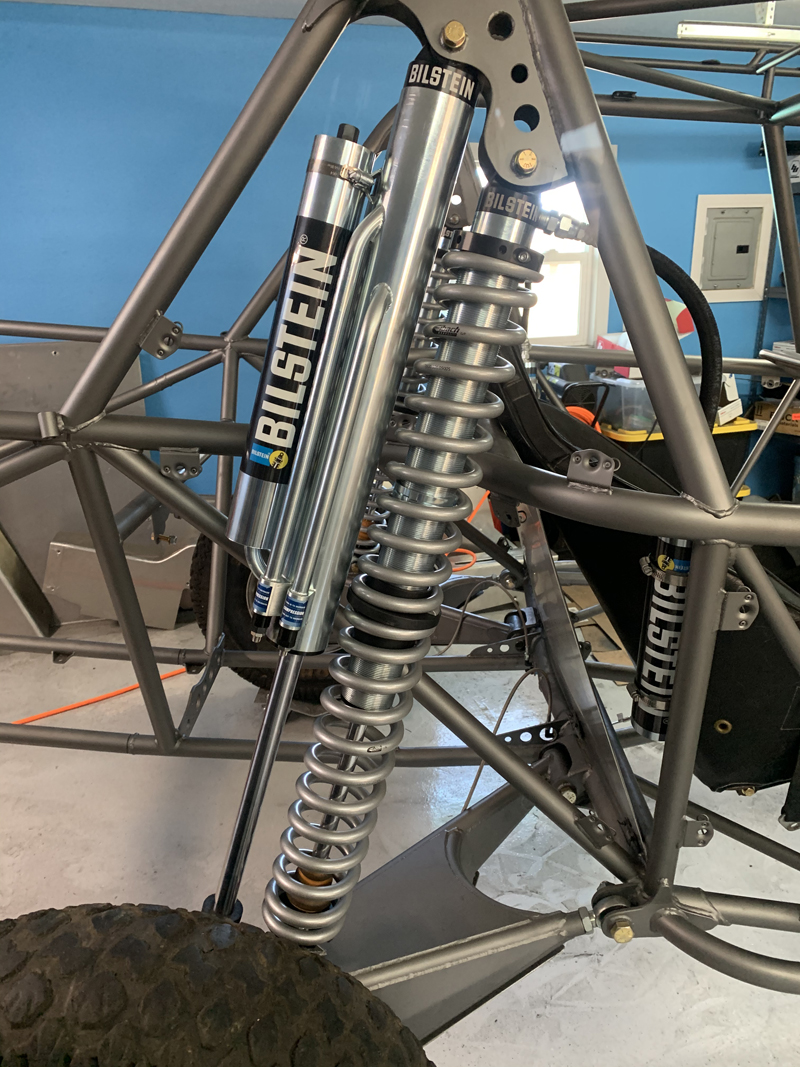
05 September, 2020 Big day on the pre-runner; Trevor picked up 3 of our 4 bypass shocks last week so we were able to install those (waiting for the last one to be built). We installed both rear shocks and the right front shock today; the rears posed no particular difficulties but we had been concerned about possibly needing to clearance the front upper control arms for the shock bypass tubes - fortunately, Bilstein bypass shocks allow the user to "clock" the upper mount in whatever orientation suits the application so we were able to avoid any control arm modifications. We're happy about that! We also welded on the rear seat mount tabs, plumbed most of the turning brake/rear brake lines and started fabricating the power steering control valve to rack hoses.
29 August, 2020 Trevor and I made good progress on the pre-runner today; we have the front brake lines complete, the coil-over reservoirs mounted, the rear brake and clutch line mounts welded and the foot well area sheet metal fitted around the steering control valve. We had hoped to weld on the rear seat mount tabs also but after looking at it a while, we decided to go a different direction - hopefully get them installed next weekend.
22August, 2020 Today was a short work day on the pre-runner; Trevor prepped and painted the roof rack and installed the brake calipers while I wrapped up the mounting of the turning brake and began the fabrication/installation of the front and rear brake lines. That required that we reinstall some of the sheet metal panels in the driver/co-driver area so that we could install bulkhead fittings to go from the master cylinders to their respective brakes. Reinstalling the sheet metal required some cutting and trimming to work around the steering control valve - one thing leads to another...... Not much progress today but some is better than none. For next time, we're planning to complete the fitting of the footwell area sheet metal around the steering control valve, shorten the front brake flex lines an inch or so, then plumb the front brakes completely. Hopefully, we can also plumb the rear brakes and clutch hydraulics completely. With any left over time, we'll weld our shock reservoir mounts to the chassis and start tidying that stuff up a bit.
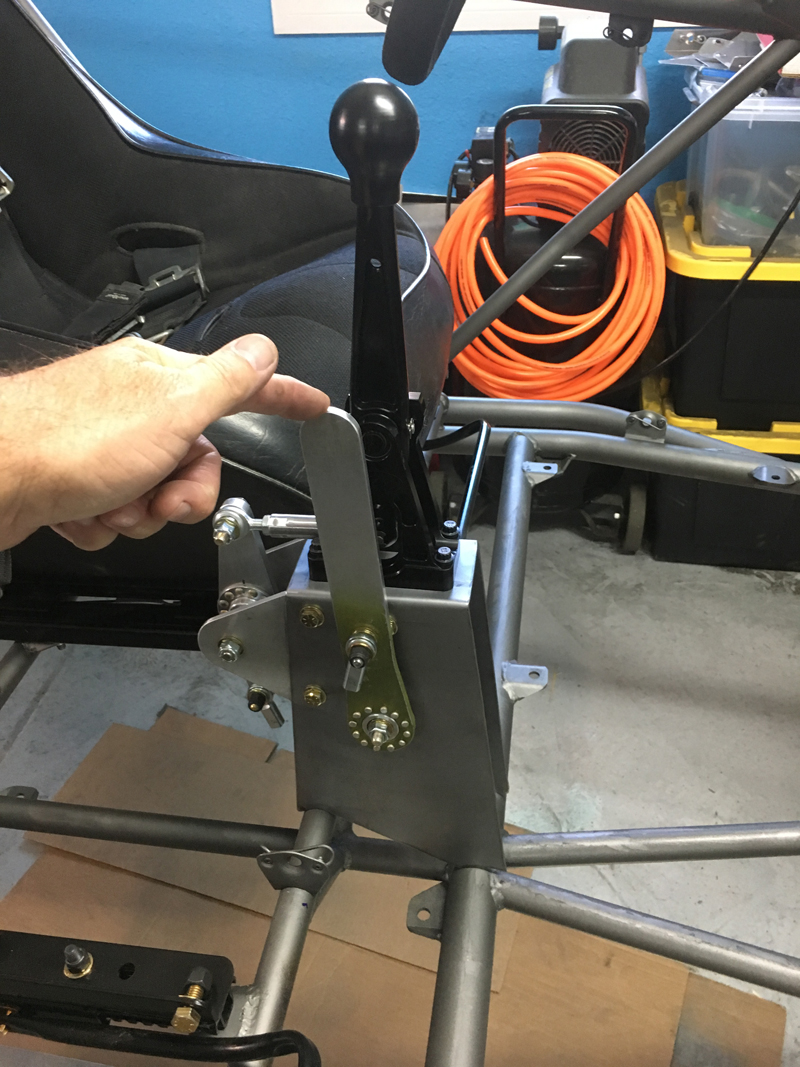
15 August, 2020 Trevor and I spent today getting the turning brake assembly located and mounted. I had fabricated a bracket "blank" during the week and we trimmed it to fit then located the ideal position for the turning brake lever. Once we were happy with the fit/location, Trevor welded it in place. The handle is angled a little towards the co-driver so that all three controls housed within the tunnel have good clearance from one another and free runs for their "push-pull" cables.
Trevor has the bypass shocks on order now so we hope to be installing them next weekend. We are also planning to fabricate and install mounts for the rear seats next weekend.
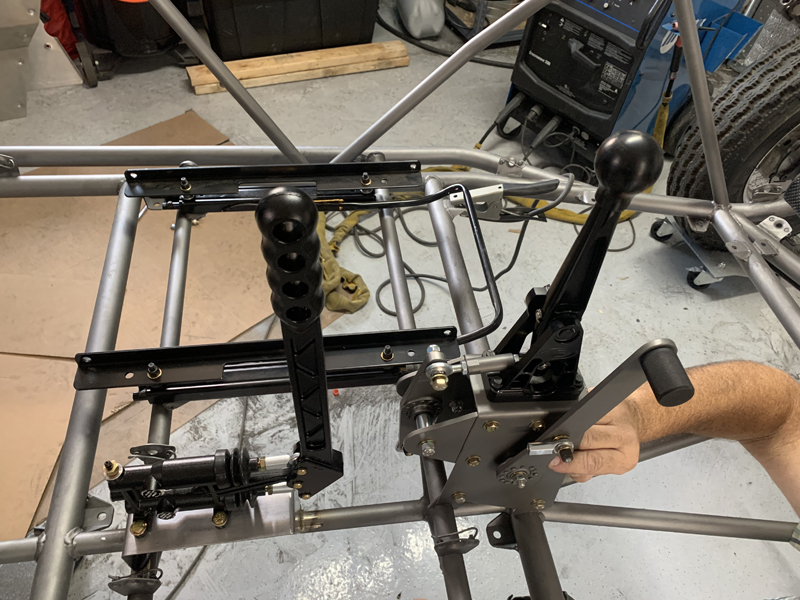
08 August, 2020 It's been a busy week; I was able to get all the shifter mount, bell-crank and reverse lever parts designed and fabricated before the weekend. We spent today installing the shifter support assembly and trimming the sheet metal tunnel for the new "protrusions" (reverse lever and shifter bell-crank). We also trimmed the dash panel to clear the steering column. Now that the shifter is sorted out, we can start fitting the turning brake assembly. Once that's installed we'll be able to begin running brake lines and making the brakes functional.
01 August, 2020 We've been designing our shifter mount over the last couple of days - making cardboard templates that we can use to check fit and function. This will be a bit more than a simple shifter mount; it will also include a bell crank to change the direction of shifter cable movement and and a "reverse" lever. We chose to use a Fortin sequential shifter - it's a single lever shifter and doesn't include a reverse lever. As a result, we need to fabricate our own reverse lever. Also, the Fortin shifter "pulls" the shift cable in the "upshift" direction and we need it to "push" - that's why the bell crank is needed. The actual shifter mount bracket is already made but we want to fabricate all the bell crank and reverse lever parts before installing it in the chassis.
27 July, 2020 We're hoping to get our shifter and turning brake units installed in the prerunner next; that means we need to design not only the mounts but the linkage systems to connect them to the transaxle and brakes first. Sequential transaxles are new to us so we've been doing research into the requirements for shifting a Weddle S5 (we plan to use this design), for both forward and reverse gears. Our friend, Rick, at "Powerbox" has been a huge help with photos and descriptions. Weddle has also been very helpful - they sent me the S5 installation guide. Now that we have a good understanding of the transaxle's requirements we are beginning the design of our mounting and linkage systems.
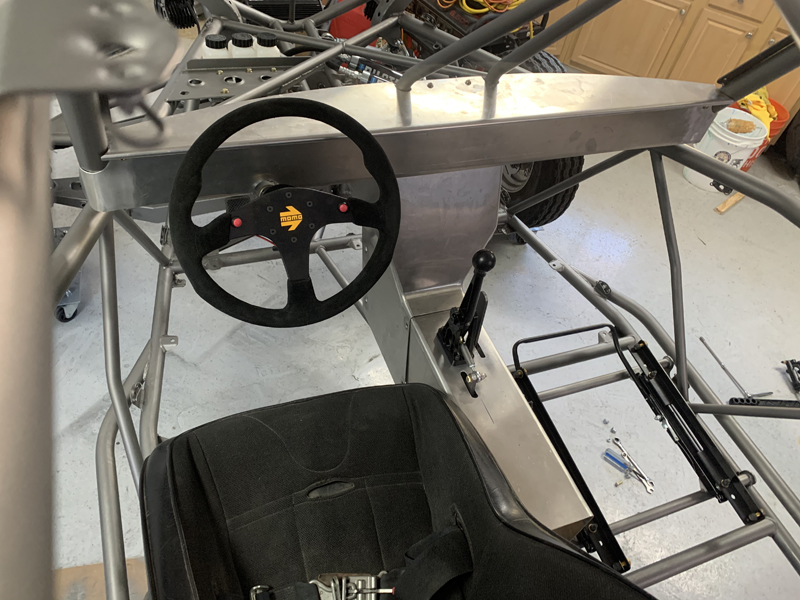
25 July, 2020 Trevor and I spent most of today on the pre-runner. We started by installing the front seat sliders and driver's seat - that allowed us to fine tune the position and angle of the steering wheel then weld on some "stops" to keep the steering column correctly located. The steering column mount itself is not welded to the chassis (high strength band clamps only) and could otherwise be jostled out of the ideal location/orientation - no chance of that now. Getting the driver's seat and steering wheel "final" mounted allows us to locate other controls with confidence; the shifter and turning brake locations can now be identified and mounts designed. Our shifter will be located atop the sheet metal "tunnel" between the seats but will need an underlying support structure; we were able to do a preliminary design and make a pattern for that support structure - I'll fabricate it at the shop this week and hopefully we can get it mounted on the chassis next weekend. Finally, we spent some time tidying up a few hardware issues; trailing arm pivot bolts, turning light mount bolts and steering control valve mount bolts. We weren't happy with the rear trailing arm outer pivot bolt lengths (not quite long enough to engage the "lock" portion of the nuts) - we replaced both sides with correct length bolts. I wanted to replace the steering control valve bolts with "drilled head" bolts so we could safety wire them once secured - I drilled a couple of bolts at the shop last week, then installed and safety wired them today. Lastly, the turning lights mounted to the front bumper need "anti-rotation" bolts installed; we drilled and installed them today. We're happy with where we're at as of now; no significant "open" issues that need correcting.
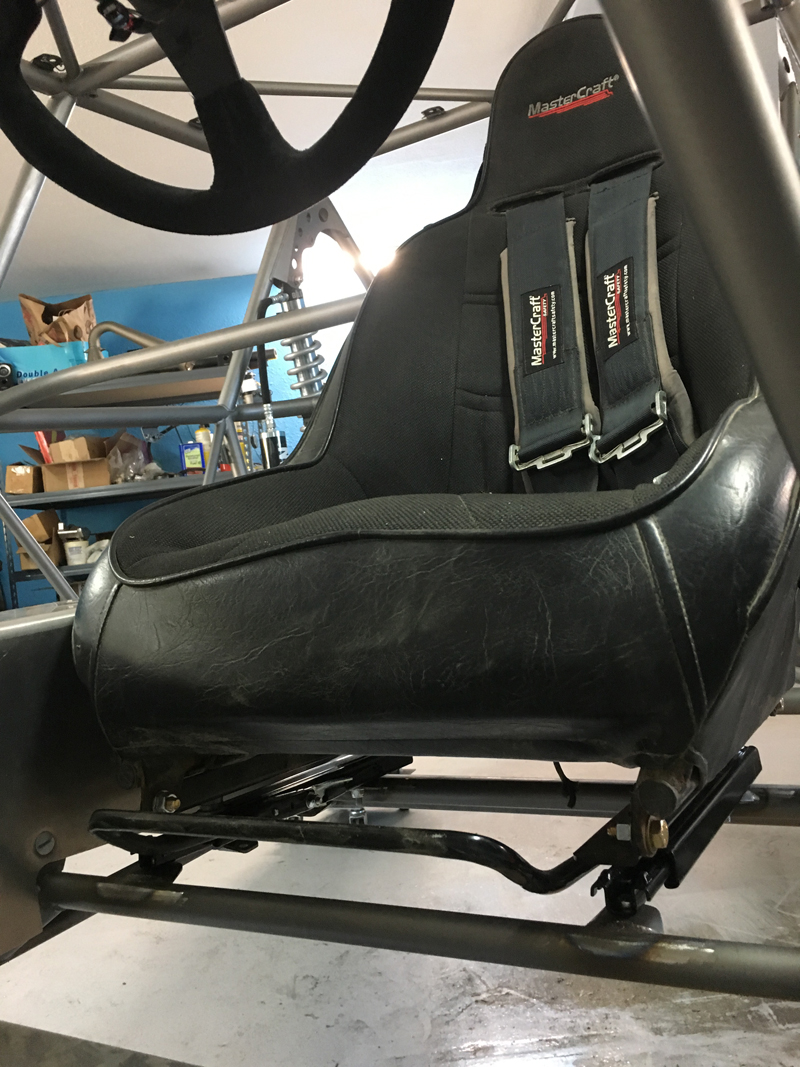
20 July, 2020 Moving forward on mounting of the prerunner driver and co-driver seats. I spent a little time today measuring seat mounting locations and planning the method of attaching the seat sliders. Kent Lothringer did his homework when he designed the chassis - his seat support structure is exactly where we want it and we only have to weld tabs where we want the seat to end up laterally. We ordered Mastercraft Safety seat sliders and another brand seat mount brackets; we received one of the seat slider sets and the mount brackets and are expecting the other slider in a couple of days. It looks like everything should just bolt together, then we can locate the seat and weld the mount tabs in place. Hopefully we'll get the front seats installed this coming weekend, then we can move forward with all the other stuff that revolves around seat location.....
18 July, 2020 Nothing much to report this week; I've been distracted by an issue with my airplane - every two years, it requires a "transponder check" that must be done by a certified avionics technician. The transponder is an electronic device that works with the Air Traffic Control radar system to show the position and altitude of my aircraft in flight and is equipment required in order to operate in San Diego's airspace. It's all sorted out and signed off now but it was a bit frustrating and took most of two weeks to work out when it should have taken just a few minutes..... That's my excuse and I'm sticking with it.... I spent a few minutes yesterday replacing pre-runner "Mid-Board" hardware and steering shaft "stop collars". They each had temporary hardware installed; they now have permanent hardware. We're currently awaiting delivery of several parts orders that will allow us to mount the front seats/sliders; once they're mounted, we can confidently locate and mount the shifter and turning brake levers. We're reluctant to plan those installations until at least the driver's seat is installed and we can't really do any of the brake/clutch plumbing until the turning brake unit is mounted.... Hopefully, we'll receive all the needed parts this coming week so we can resume moving forward!
12 July, 2020 Steady progress being made on the pre-runner. Yesterday, we fabricated mounts for some of our driving and cornering lights then welded them in place. We also replaced some "temporary" hardware in the steering and mid-board hubs with permanent hardware (we try to put everything together "final" as much as possible but sometimes we have to source or modify hardware first. Tie rod to rack bolts for example - we needed to drill the heads for lock wire). Once we ran out of actual assembly and fabrication tasks, we began planning the location and mounting of our shifter and steering brake assemblies. That involved partial reassembly of some of the chassis "tunnel" sheet metal so that we could determine where we wanted the controls and how to mount them. We'll need to fabricate a support structure for the shifter and turning brake that will reside inside the tunnel - we think the shifter is going to sit on top of the sheet metal but the turning brake will be mounted inside the tunnel. We also need to consider where and how to mount a "reverse" lever - we chose to purchase a Fortin single lever sequential shifter so we need to add the reverse function somehow. We're still in the planning stages but we need to get them mounted so we can start routing brake lines (at least the turning brake needs to be mounted before we can)...
04 July, 2020 Happy 4th of July! We celebrated the day with a visit to Trevor, Kristen and Henry with lunch and apple pie for dessert ("COVID 19" style - they in the house and we in the garage.....). While there, Trevor and I managed to work a little on the prerunner - we made templates for front bumper light mount brackets and installed the brake and clutch master cylinders. We wanted to get the master cylinders installed and the pushrod lengths adjusted to verify that we like the configuration and that we had full range of motion on both the brake and clutch pedals. We each sat in the driver's seat to check our "fit" and to confirm that we had full travel on the pedals without risk of interfering with the steering shaft or control valve (no issues noted). With that behind us, we can start running the brake and clutch hydraulic lines. The front brakes and clutch are simple and we don't need any other components to allow us to do the majority of fabrication. The rear brakes are a little more complicated; we've chosen to install "turning" or "cutting" brakes and we can't fabricate the lines until the turning brake unit is mounted. We have it on hand but we'll need to choose a suitable mounting location that doesn't interfere with the shift lever while also within easy reach of the driver. We're thinking we want the shifter on hand and we want to mount the driver's seat so we have a clear picture of the location options available to us before we begin fabricating the rear brake lines. We can fabricate a line that goes to the area where the turning brake will be mounted but we can't really go further until it's actually installed.
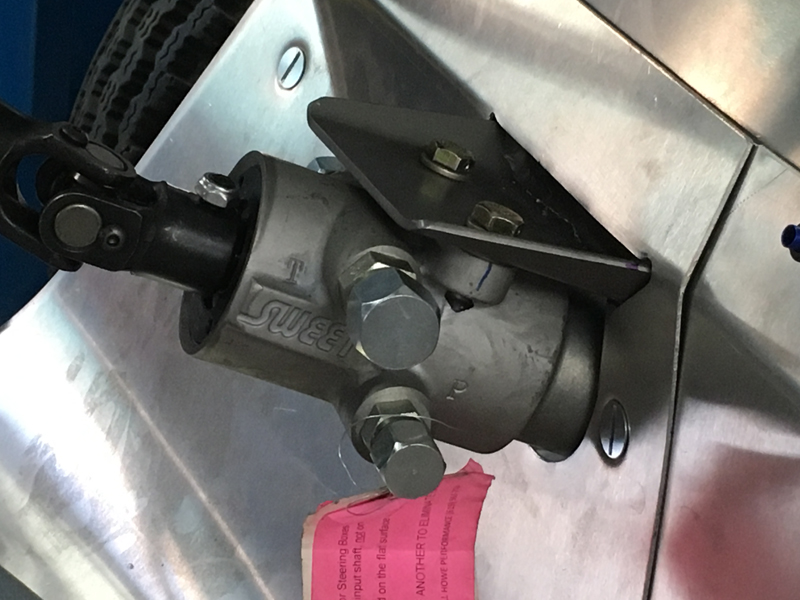
27 June, 2020 Another Saturday pre-runner work day for Trevor and I - it's hot out but Trevor has a well insulated and air-conditioned garage..... We had a few things on our list for today: dress up the splines on the rack end universal joint so it'd actually go on without a hammer being necessary, install the correct hydraulic fittings on the power rack, finish up the steering shaft fabrication and install the remaining rear shock now that we have the slider and spring seat for it. The universal joint for the steering rack end of the shaft was an uncomfortably tight fit as received and we felt there must be something wrong with it. We removed the rack from the chassis so that we could more easily examine the fit and correct the problem. Turns out a couple of the splines inside the universal joint had irregularities that required a little "dressing". Once done, the universal joint fit as expected. While out of the car, we took the opportunity to install the correct hydraulic fittings on the rack - when mounted on the chassis, we didn't have room to make the swap so this was a good opportunity to get it done while solving another problem. While I was fiddling with the universal issue, Trevor assembled and installed the remaining rear shock on the car and removed the jack stands that had been supporting it since we brought it home. It's finally standing on it's own! Once the universal joint fitment issue was resolved, we were able to reinstall the rack and measure for the final section of steering shaft. We cut the shaft to length and reinstalled the rack with the shaft fitted in the universal joints at either end. With everything aligned and secured, Trevor tack welded the shaft at each universal so that we were assured that the "fit" would be correct once fully welded. We removed the shaft assembly and Trevor fully welded the shaft to the universal at each end. Once cooled, we painted and final installed it along with the rack, steering control valve and the other steering shaft sections. The steering system is now mechanically complete - the hydraulics will come later but we have manual control at this point.
20 June, 2020 We spent the entire day working on the pre-runner, beginning in the morning at our shop picking up our TIG welder and a few other tools to bring to Trevor's garage. We're building the pre-runner there so we need to have the right tools on hand in his garage. While at the shop, I made a mounting bracket for the power steering control valve. After delivering the welder, we began the process of routing/fabricating the steering linkages. We were able to get the control valve and steering wheel mounted, then fabricated the shaft that connects the two. For some reason, we weren't able to get the universal joint at the rack end to fit - we need to remove the rack to solve that problem before we can fabricate the final bit of steering shaft. I think it's a minor "fitment" issue that we can resolve quickly once the rack is off the car.... Having run into that road block, we chose to install the coil carriers; the fronts are installed and one of the rears as well - the other rear will go on as soon as we find the slider and spring seat we seem to have misplaced.....
17June, 2020 Trevor and I spent a couple of hours working on the pre-runner today; we needed to modify our coil-over shocks to be "coil carriers" only. We took both fronts and both rears apart, removed the "shim stacks" and reassembled them all. We were going to install the springs afterwards but discovered that we didn't have all the parts we need for the rears and we need to modify some parts for the fronts. It's always something. Since we couldn't install the springs and mount the shocks today, we spent a little time planning the steering system layout. We have some photos of other examples of this type car, so we have an idea how others have done it...
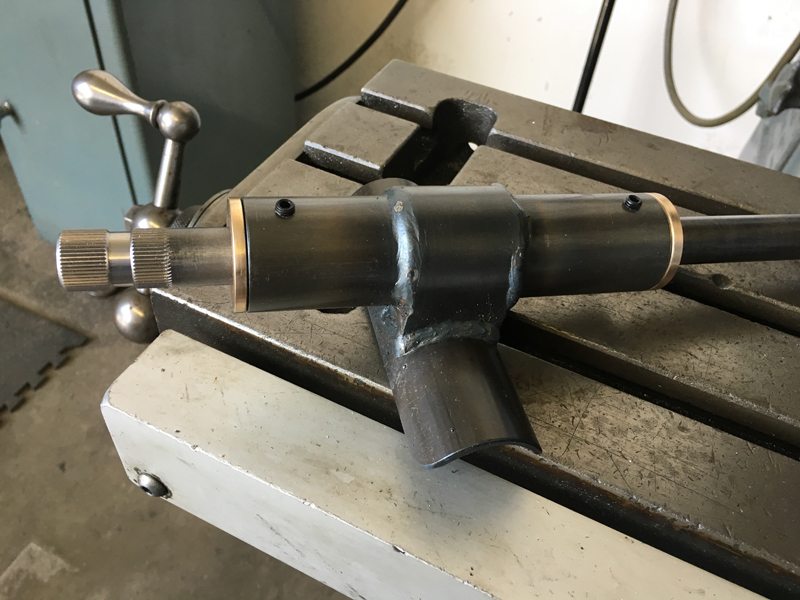
08 June, 2020 I spent some time at the shop fabricating bronze bushings for our pre-runner steering column. Kent Lothringer provided some prefabricated hardware for the steering column but it did not include bushings of any kind for the actual steering shaft. We debated about what material to use: Delrin or Bronze. Bronze seemed to be a more durable choice so I acquired a length of bronze rod and spent a couple hours machining and installing the bushings. I've also ordered all the other parts needed to fabricate the entire steering shaft assembly - several universals, a steering quick disconnect and a steering wheel. We have to decide where and how to mount the steering control valve, then we'll fabricate the shaft to fit.
30May, 2020 We're back working on the Lothringer pre-runner, finally. We've had it on the "back burner" because of other commitments but now we're able to start work on it again. We spent Thursday stripping the frame down in preparation for paint; we removed all the sheet metal, the suspension arms and misc. mounting brackets. After cleaning and de-greasing, we painted the suspension arms and their mounting locations on the chassis. Trevor completed the painting of the remainder of the chassis the following day. Today, we'll continue the painting process with the roof rack and touch up of any missed areas. Hopefully, we'll "final install" the suspension arms and, if we have the hardware on hand, mount the front spindles and rear hubs. At that point, we'll be able to bolt on a set of wheels/tires and have a true "roller". We had previously ordered the "spring carriers" for the front and rear suspension but with the Covid-19 crisis, we haven't received them yet. We'll have to make some temporary "stand-ins" to hold the chassis at ride height until they arrive. After the chassis is reassembled, we can begin the process of installing all the "systems". We'll begin with the steering - we have all those components on hand. Following that, we'll install the brake lines and pedal cluster. As time and money permit, we'll build out all the other systems - check back for updates.
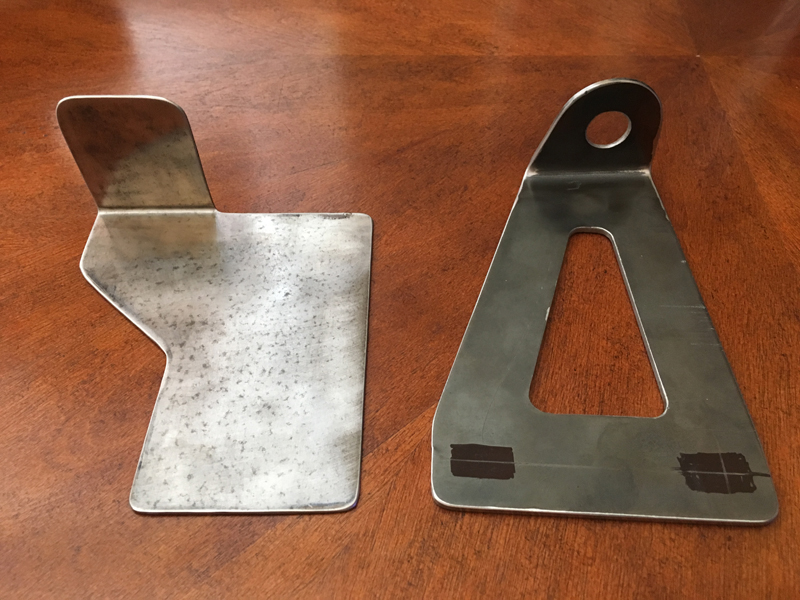
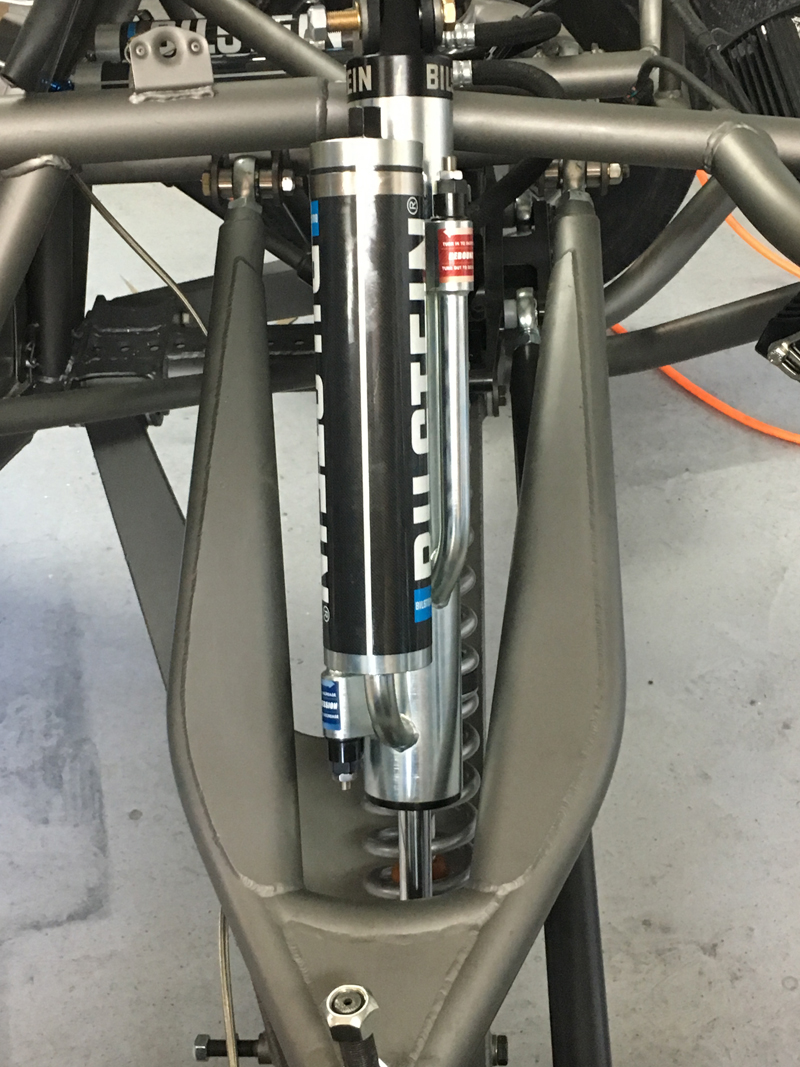
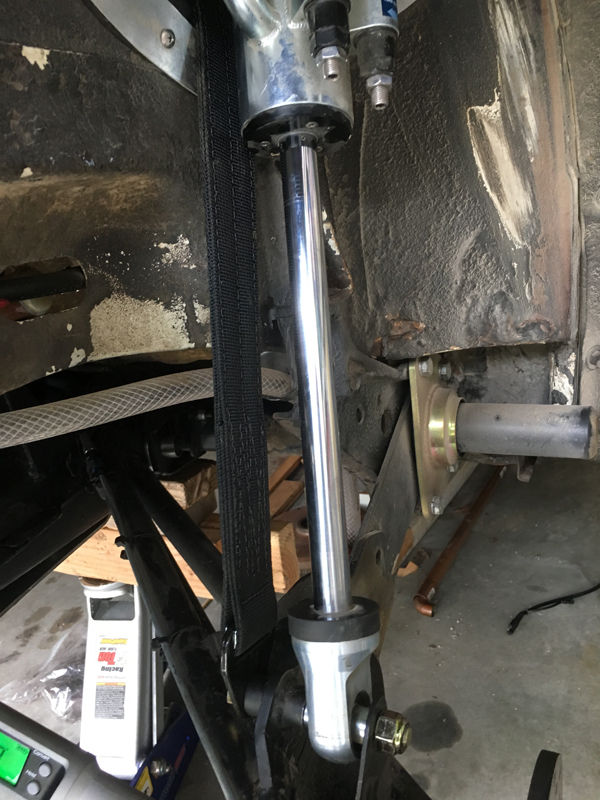
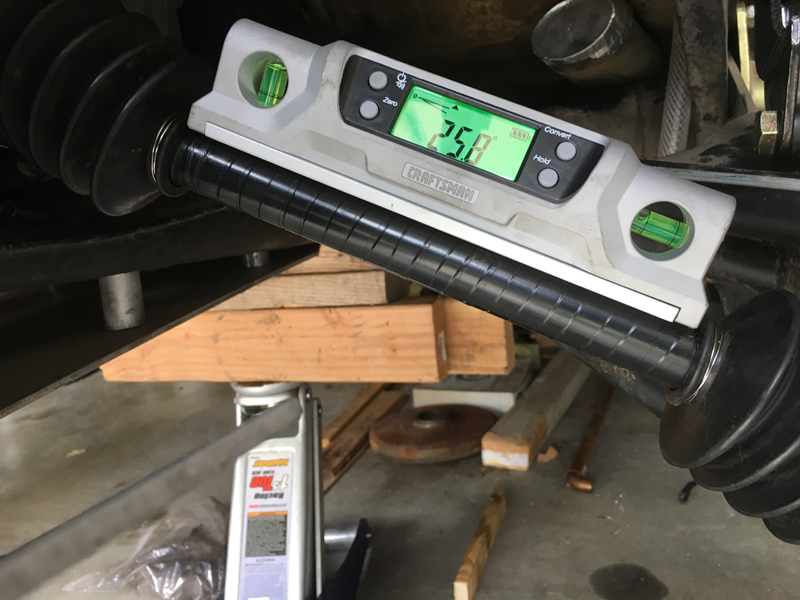
31 March, 2020 The yellow Baja Bug's axle assemblies are reinstalled and ready to run. Over the last several days, I've updated all four CV's to true "race prepped" versions, replaced both axles with lower mileage race car spares and installed new CV boots all around. Having failed one of the CV's during our test run, we were careful to measure the current CV angles and decided that we needed to install limit straps to protect the CV's in the future. I installed the limit straps today and am pleased with the result - the CV's now see a maximum of 26 degrees axle angle at full droop. Typically, race prepped 930 CV's are safe to about 26.5 degrees so we believe we stay within that "safe" zone now. Installing limit straps obviously reduces the total suspension travel at the rear end: we lost about 1" of travel on both sides; we can regain that lost travel in the future if we choose to "notch the horns" and lower the transaxle like on our 5-1600 car. That's a lot of work though, we'll probably live with the travel we have for now....
Limit strap installed on right rear shock
Axle and CV angle at full
droop
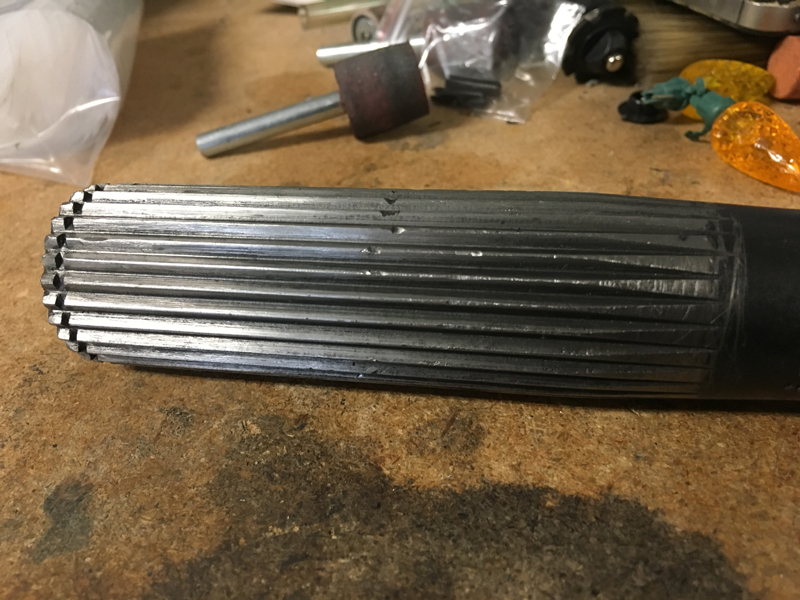
23 March, 2020 Interesting times - We in California are currently subject to a state government "stay at home" order due to the "Covid-19" virus pandemic..... We're making do with the situation and are not coming into close contact with other people. We'll eventually need to shop for food but that's hopefully down the road a way. The most difficult aspect of this situation is the forced separation from Trevor's new family - they have a new baby, Henry, and the last thing we want to do is to bring some new virus into their home..... Murphy's law being what it is (whatever can fail, will - at the worst possible moment), our refrigerator decided now would be a good time to stop keeping things cold.... We were forced to call a repairman out; we were surprised that he was actually still available given the stay at home order but he came right over. It's now working again, though not 100% right..... We bought a replacement, expecting that it would not get delivered for weeks (again due to the stay at home order) but we were surprised when it was delivered yesterday. I think we're back in a stable "food storage" condition. Not happy that we had to have other people in the house right now but we kept our distance and cleaned afterwards..... I'm personally finding it difficult to be so limited but I'm finding little projects around the house and spending time working on Trevor's Baja Bug. We damaged a CV during the recent desert outing and I've disassembled, cleaned and inspected the affected axle assembly. The passenger side, transaxle end CV "cage" failed and the broken bits damaged the "star" and axle splines. Surprisingly, the balls and outer housing seem fine. I have a new CV on order (to allow me to turn this axle into an emergency spare) along with 4130 "race" cages for the other side's axle assembly. We have a spare "race axle" assembly so I'm going to install it on the failed side and then update the other side axle CV's with 4130 cages.
The carnage that results when
you allow a CV to operate beyond it's angular limits......
Axle splines damaged by the
failed "cage"
21 February, 2020 We took the Baja Bug out to the desert today for a suspension test and tune session; we were very pleased with how the car handled the rough terrain. We did make a few initial adjustments to the rear shock bypass settings that resulted in a little better ride and handling; we'll continue to fine tune the settings as we gain more experience with the new suspension. The front suspension doesn't have adjustable compression or rebound bypasses - fortunately, the stock valving is very close to perfect! One of the CV's failed at the end of our testing; we knew that we were pushing them to their limits so we weren't surprised when one failed. Fortunately, we were done testing for the day anyway. We'll probably install limit straps to reduce the maximum angular displacement they see; we'll also replace them all with true "race prepped" CV's. Here's a short clip of one of the tuning runs: We were pleased with the updated engine and transaxle perfomance; the engine pulled hard and smooth and the new transaxle gear ratios were a perfect match for the power band and terrain. Along with the new suspension, those updates make this car a very capable and comfortable "pre-runner" now.
10 February, 2020 Trevor and I drove the yellow Baja Bug yesterday - the first test drive after installing the re-geared transaxle. We're happy to report that the gear ratios are perfect now! We had also addressed a couple of minor oil leaks while the engine was out of the car; everything looks tight now. It was a real pleasure to drive the Baja again - it's been a long time! Now that everything seems to be working the way we want, Trevor will be wanting to get the car in the desert so we can tune the suspension a bit. It's amazing how much it drives like our 5-1600 car now; the "fast steering" that comes with the rack and pinion setup isn't ideal for street driving but it'll be great off-road. Tuning the suspension should get us close to "race car" handling in the rough also but now that Trevor is a father, it may be a while before he finds an opportunity to get it in the dirt.......
02 February, 2020 We welcomed a new member of the GONZO Racing team this afternoon; Henry W. Anderson was born to Kristen and Trevor this afternoon at 3:59 pm after a nearly 32 hour labor!
25 January, 2020 Trevor and I finished putting the yellow Baja Bug back together today. We installed the engine then did it's first "post re-build" oil change and valve adjustment in addition to addressing a minor oil leak. We were pleased to note that the drained oil looked clean with no evidence of metal present. After reinstalling the bumper, we ran the engine for a few minutes to verify that there were no leaks then finished up with the install of the "deck scoop" and engine skid plates. By that time, Trevor needed to get home so we haven't had a chance to test drive it yet. We're expecting the transaxle gear ratios to be more appropriate now - hopefully we'll have a chance to drive it soon.
23 January, 2020 I took my torque wrench ratchet apart and found the problem last night (nothing that affected the calibration) - it's all sorted out now so I went back over the CV bolts to be sure they were all torqued correctly. In doing so, I discovered two of the boots had small cuts that we had not previously noted..... We were re-using old 5/1600 car boot flanges that had sharp edges and had cut into the boots - it was a mistake to try to save a few $ by re-using them. I went to ORW and got new flanges and boots to replace the problem parts. That replacement required that I once again remove the axle/CV assemblies from the car. After the parts swap, I bolted everything back in place, torqued the bolts and checked for free rotation - no binding at the extreme suspension travel points. Ready for the engine install.
21 January, 2020 I finished prepping the CV's and reinstalled the CV/axle assemblies on the yellow Baja Bug today; everything runs smoothly with no binding at the limits of suspension travel. My torque wrench ratchet started giving me problems midway through the install so I need to go back and check everything once I get the torque wrench sorted.... Also remaining is the replacement of one CV's boot retaining wire; I need to retrieve my safety wire pliers from the hangar to do that, hopefully in the next day or so. Once those open issues are closed out, Trevor and I will install the engine then do an oil change and valve adjustment. There are also a couple of areas where we have small oil leaks that we want to fix at that time. Hopefully, we'll be driving again next weekend!
18 January, 2020 I picked up Trevor's Baja Bug transaxle from PowerBox yesterday so Trevor and I put it back in the car today. We had the 4th gear ratio changed to something a little "taller"; hopefully that'll keep the engine RPM's in a reasonable range on the freeway but still give us good up-hill performance. We only installed the transaxle today; the axles and CV's will come another day - we want to spend a little time doing a more detailed "race-prep" to be sure we don't have any problems given our increased suspension travel.
02 January, 2020 Happy New Year! Trevor and I spent a couple of hours working on the Lothringer Pre-Runner yesterday; we mocked up the tie rods I had roughed out last week to check for correct length before welding the threaded ends in place. We then began removing all the body panels so that we have unobstructed access to the frame for us to clean and corrosion protect it. Once that's done, we'll final install the front control arms and rear trailing arms then install the front and rear hub/brake assemblies and tires/wheels so we can roll it around while we work on it. Our initial plan is to coat the tube frame so that it doesn't rust while we build the car over the next several years, then start the build with the steering system followed by the other driver controls - brake, clutch and accelerator pedals. Once the controls are installed, we can begin fabricating and installing the brake and clutch lines. We should have a functional brake system fairly quickly but the clutch system will have to wait for the transmission purchase.... We have plenty of work to do before we start needing to have the "big ticket" items on hand.
|